|
|
About the Author:Jonathan Davis is a Salesforce Consultant at Venn Technology in Grapevine, TX. He enjoys the challenge of mastering all things Salesforce. With seven certifications under his belt and counting, he’s always tackling Salesforce Trailhead to up his integration and configuration skills. |

Following up on our Salesforce Flow Basics series, we’re going to review an example of a more advanced problem that can be solved using Salesforce Screen Flows.
Salesforce Screen Flows are launched from buttons or are displayed as components, allowing users to view information and launch processes. Screen Flows are used for guiding users through complex processes one step at a time while collecting required user input. They are a great way to display information on record pages based on logic that may not be possible for formula fields.
Below, I will be walking through the creation of a Screen Flow that allows internal or external users to manage multiple records related to a Contact.

The Business Context for Our Example
Salesforce Screen Flows help users save time and avoid mistakes by streamlining complex business processes. This allows them to spend more time doing what they do best while providing a cleaner data environment–two things that get us very excited here at Venn!
One process that Screen Flows are great for is the detailed management of records related to another record. If, for example, our client has a number of email lists that their customer contacts can subscribe to, the data model might look something like this:
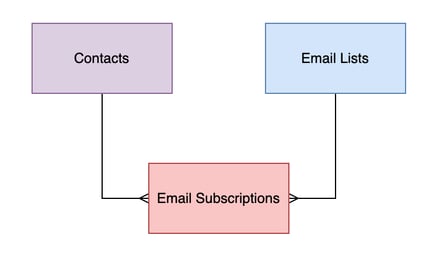
In this diagram, we show a custom object for Email Lists and another custom object for Email Subscriptions, as well as the standard Contact object. Some notes on their structure:
- The Email List object has a number of records that each represent a specific email list that customers can subscribe to
- The Email Subscription object is a “Junction Object,” meaning it has a Master-Detail Relationship to both the Email Contact object and the standard Contact object
- This “many-to-many” relationship structure allows many Contacts to relate to many Email Lists by creating Email subscriptions that connect them
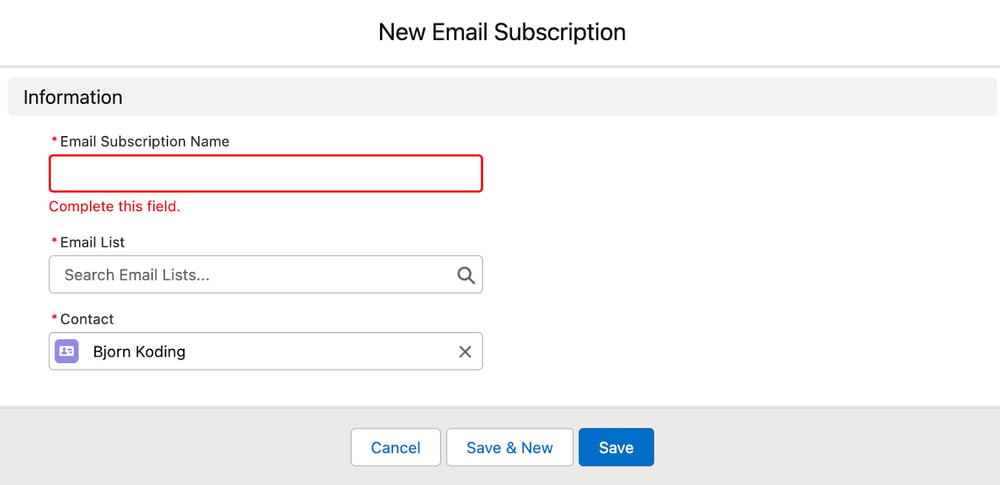
Without a Screen Flow, email subscriptions can be managed from the Email Subscription related list on the Contact object page layout by creating and deleting Email Subscription records related to that contact. While this is perfectly functional, there are a few downsides:
- When creating the Email Subscription records, the user is required to give a name to the record, which can lead to inconsistent data
- The user must use the Email List field to search for the correct Email List. This means the user must know which Email List record (and remember its name) when they are creating the record
- If a user wanted to browse the email lists available to a contact, they would need to navigate to another screen
While the downsides may not seem critical to the functioning of the business, these kinds of inefficiencies can cost valuable time and affect the customer experience over time. This is especially true if this process is something that service reps or customers manage themselves in a customer portal.
This is where Screen Flows come in! Not only do they provide internal users with streamlined processes that can include exact information needed for internal users, they are also an excellent way to allow external users on Salesforce Experience Sites to complete actions that might otherwise be too complex.
Building the Flow
Let's build our screen flow! Before we start, it’s a good idea to think of the main steps we want the process to involve:
- Provide a way for the user to see what Email Lists the Contact is currently subscribed to
- Allow the user to add or remove Email Subscription records
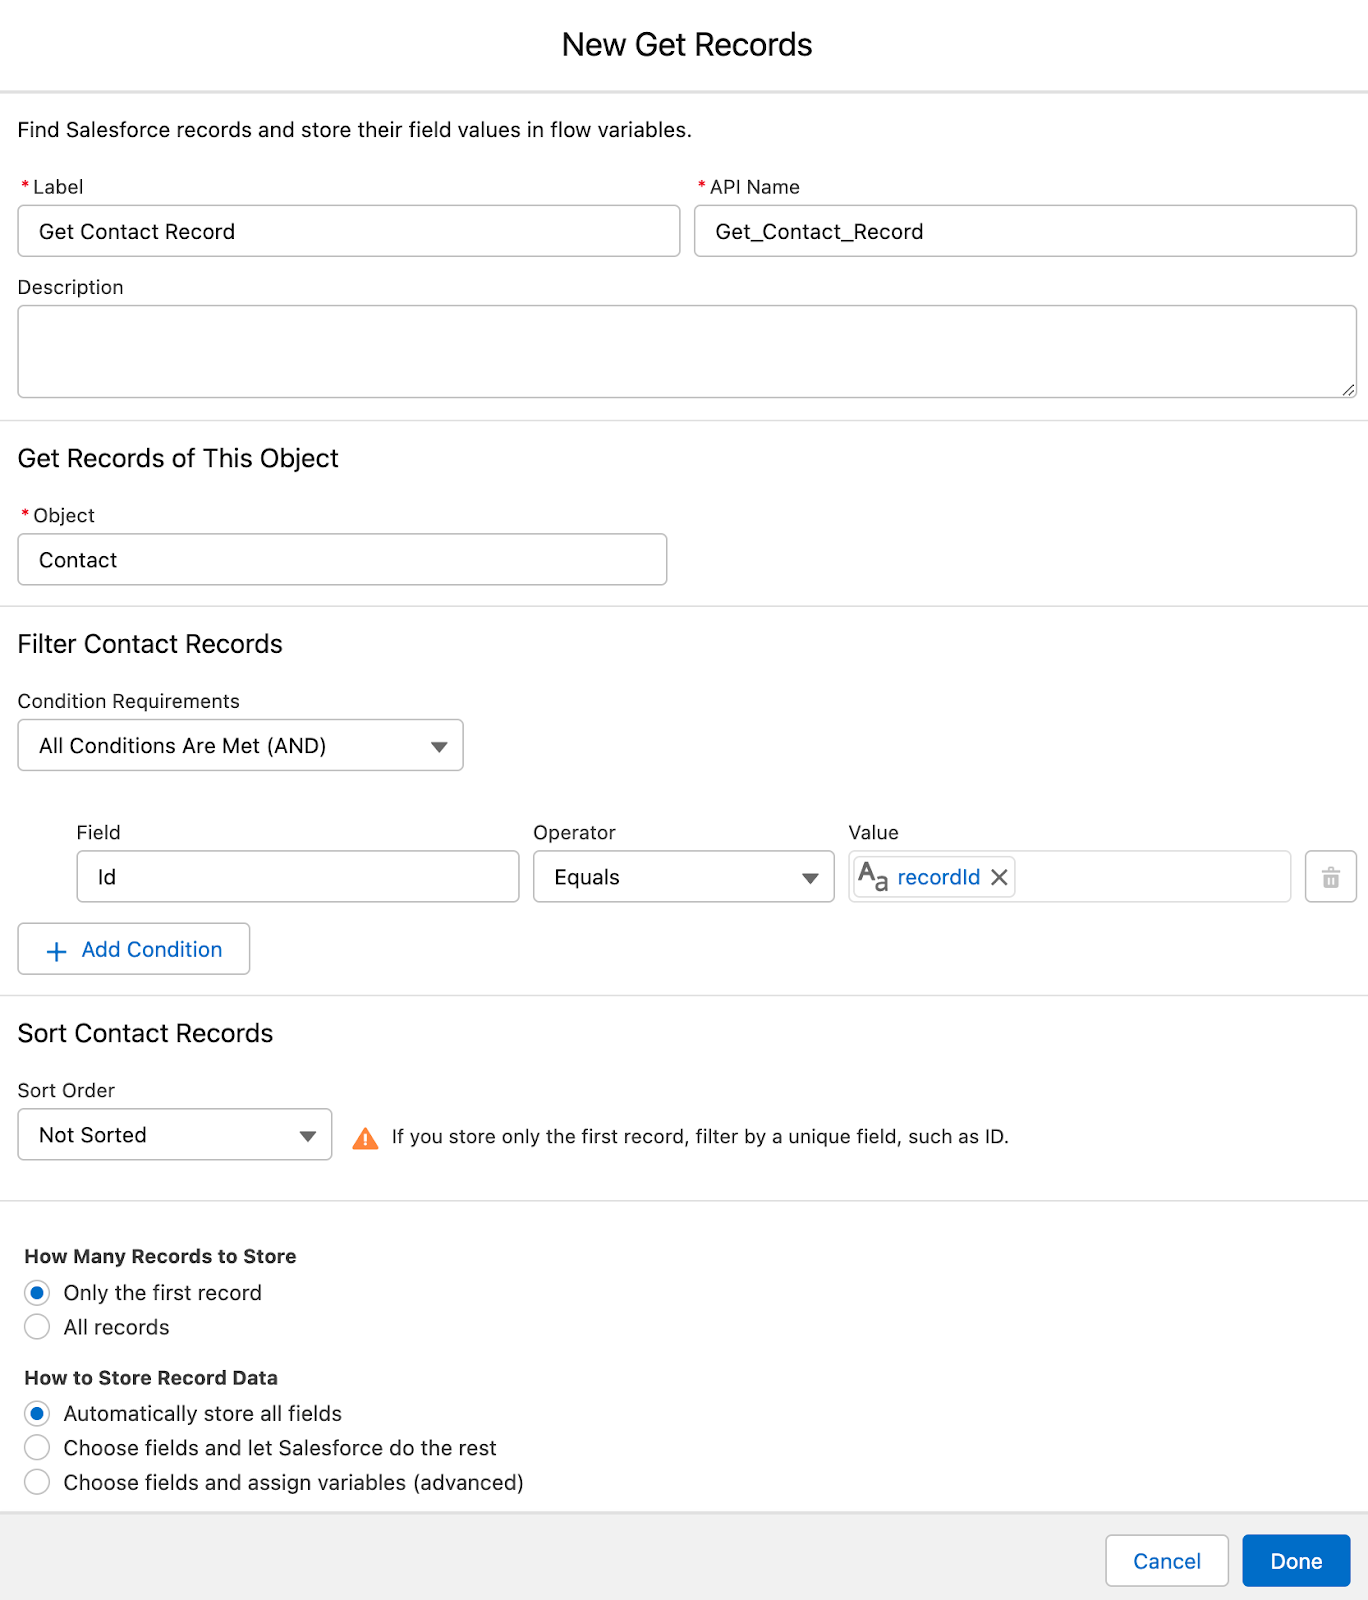
The first thing we need is a text variable to hold the record Id of the Contact. We also make sure to mark this variable as “Available for input” in order to pass this value into the flow from the page we plan to display it on. It is a best practice to always name this variable “recordId” because that is the name Salesforce is looking for when you use the screenflow in some types of actions. 
We then create our first Flow Element using a Get element to retrieve the contact record for use inside our flow:
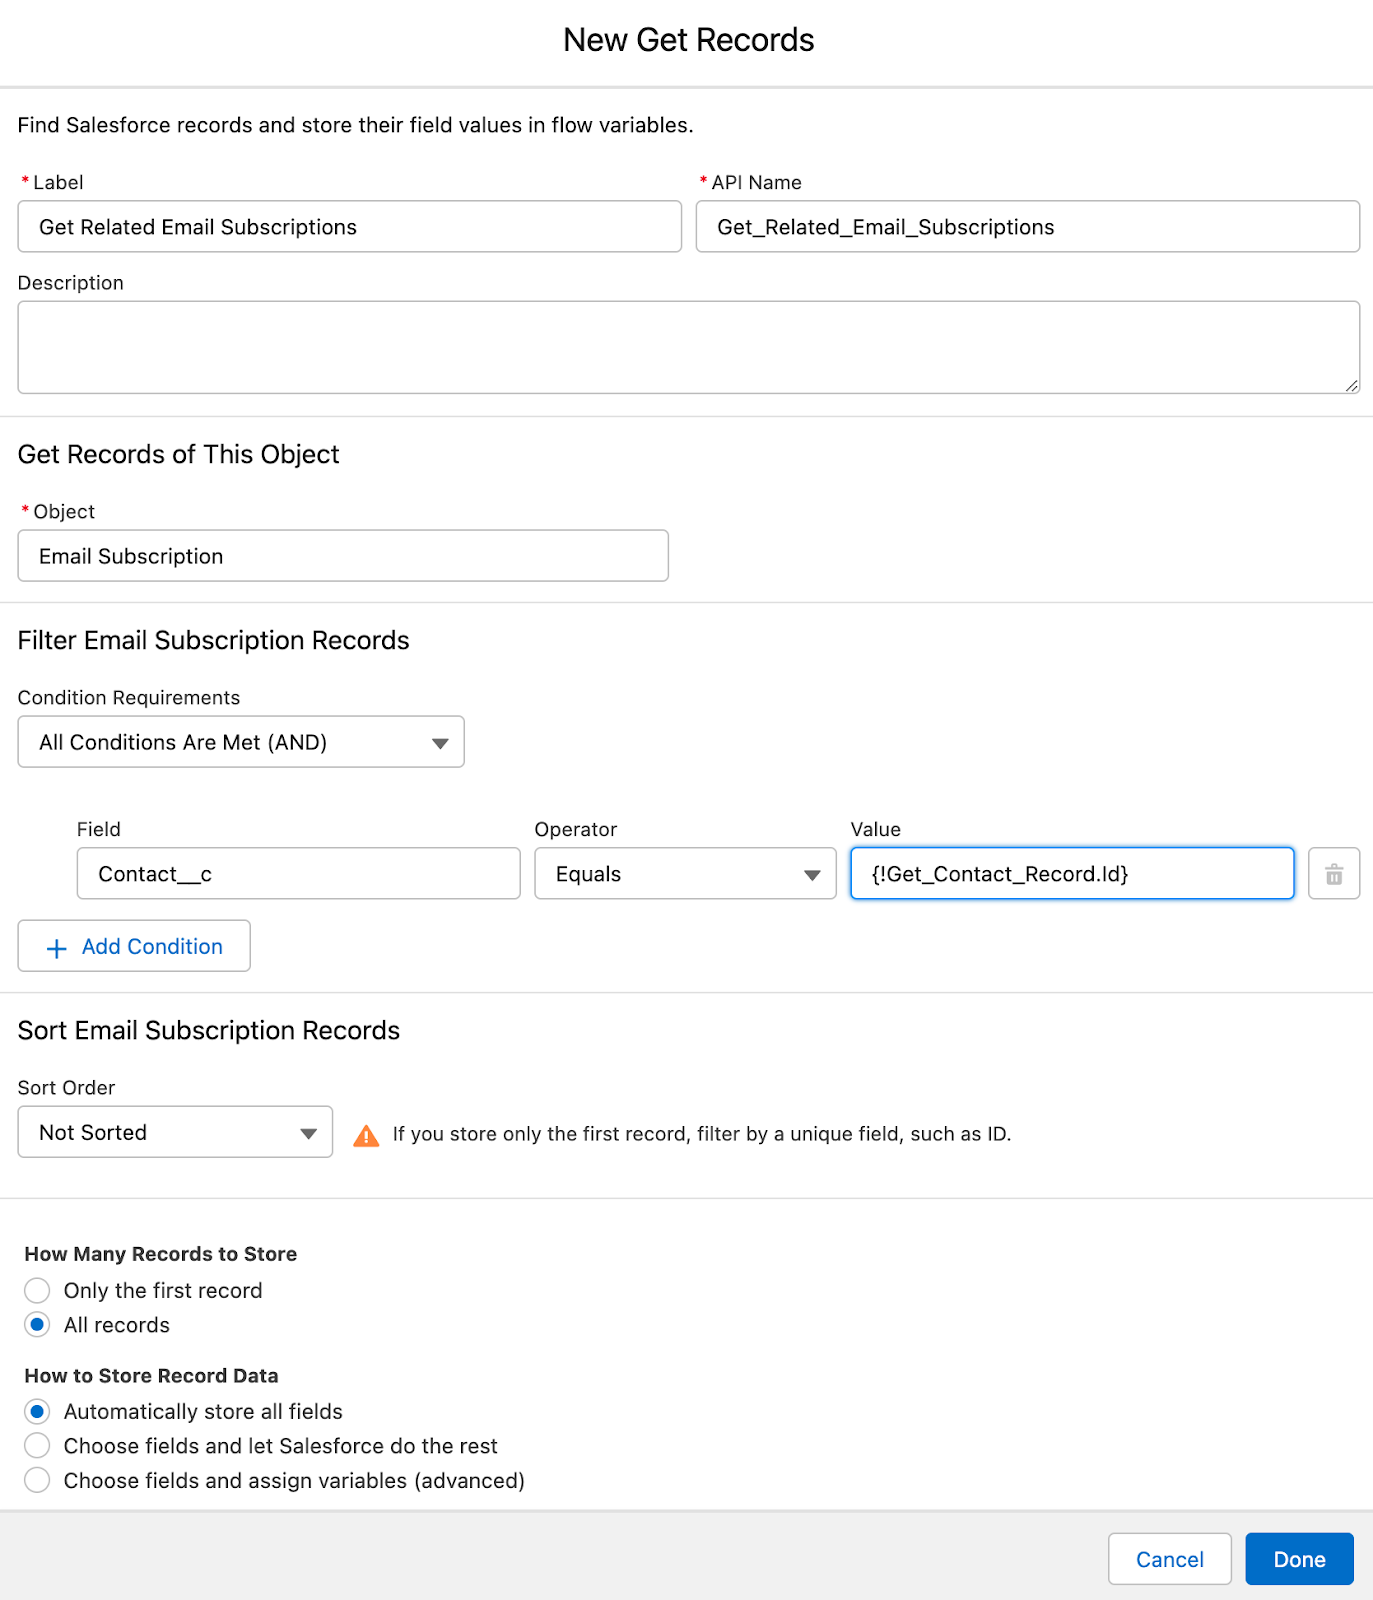
Next, we create a second Get element to retrieve all of the Email Subscription records currently related to the Contact record:
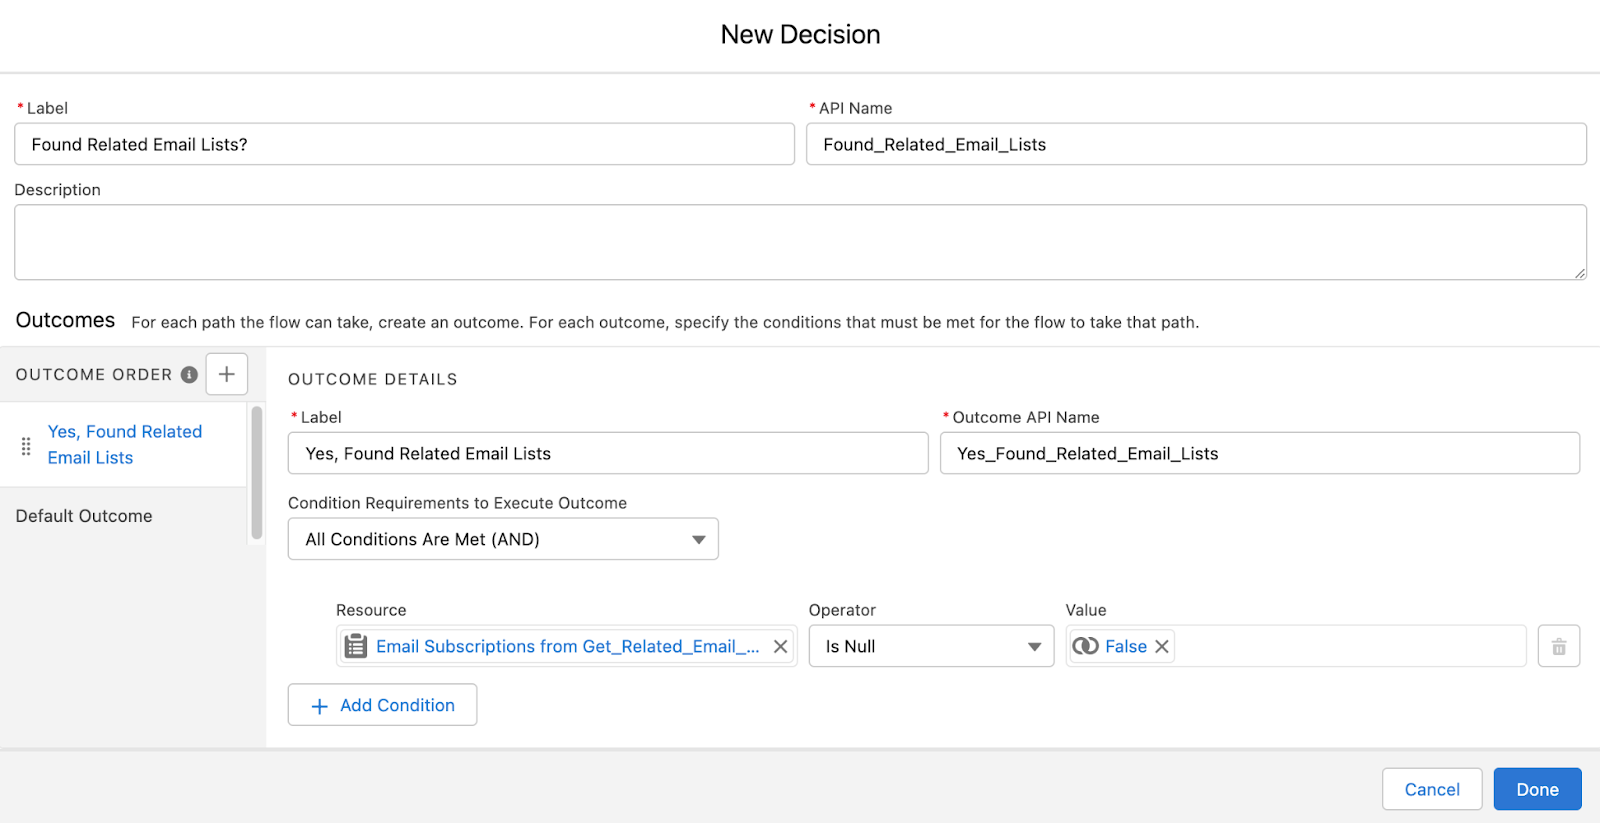
Then, we create a Decision element to check if any Email Subscriptions were found in the previous Get element. We will use the result of this decision later in the flow.
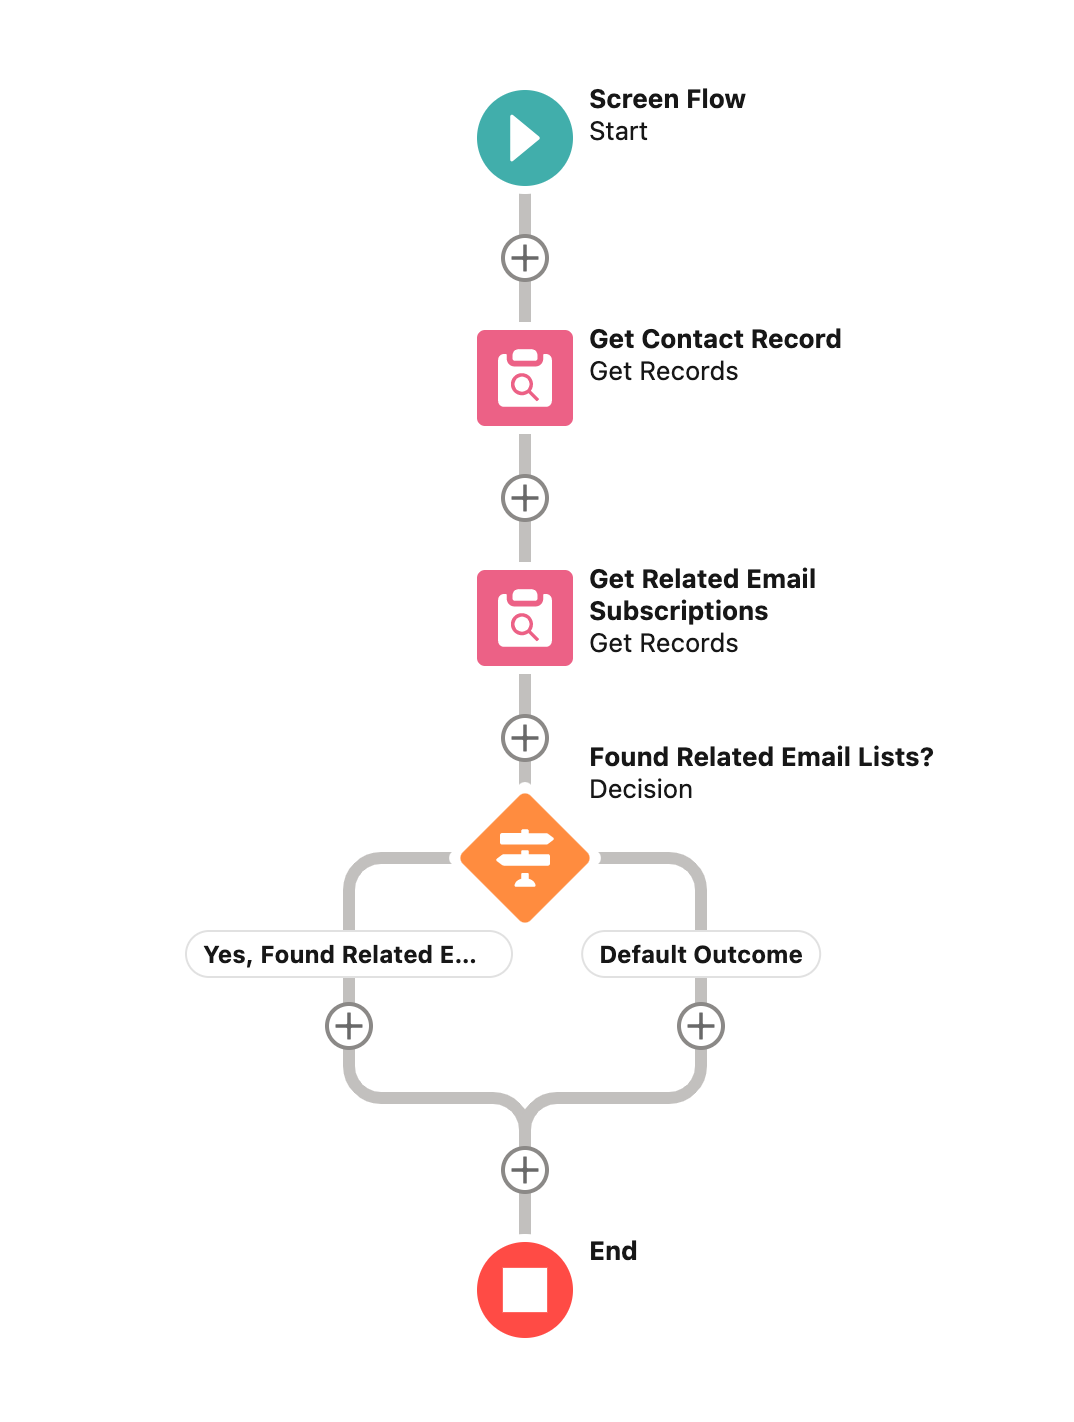
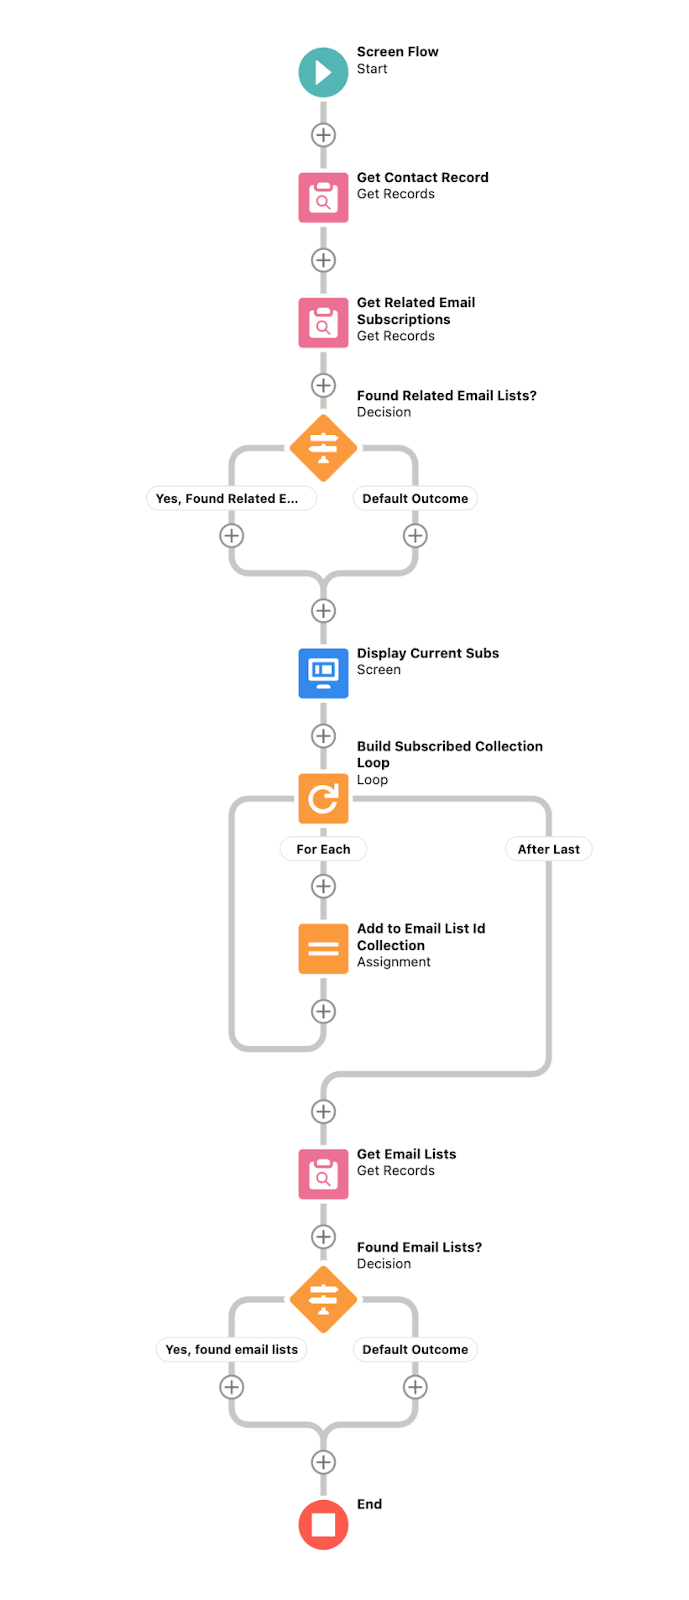
Now, our flow looks like this–all of which happens before the first screen in our flow loads:
From here, we can finally make our first screen element! We want to create the screen at the very bottom of the flow after both sides of the decision.
Before we do that, we clean up the screen, starting with hiding the header and pause button and giving the next/finish button a custom name.

Then, we add two Section components, each with their visibility based on the result of the previous Decision element.
The idea here is to show one section if the Contact is already subscribed to one or more Email Lists and another section if they are not. An alternate method of doing this would be to create two screens, one on either path of the Decision element—but my preference is to have as few screens as possible since it makes it much easier to manage changes and see that the screens are consistent across the Screen Flow.
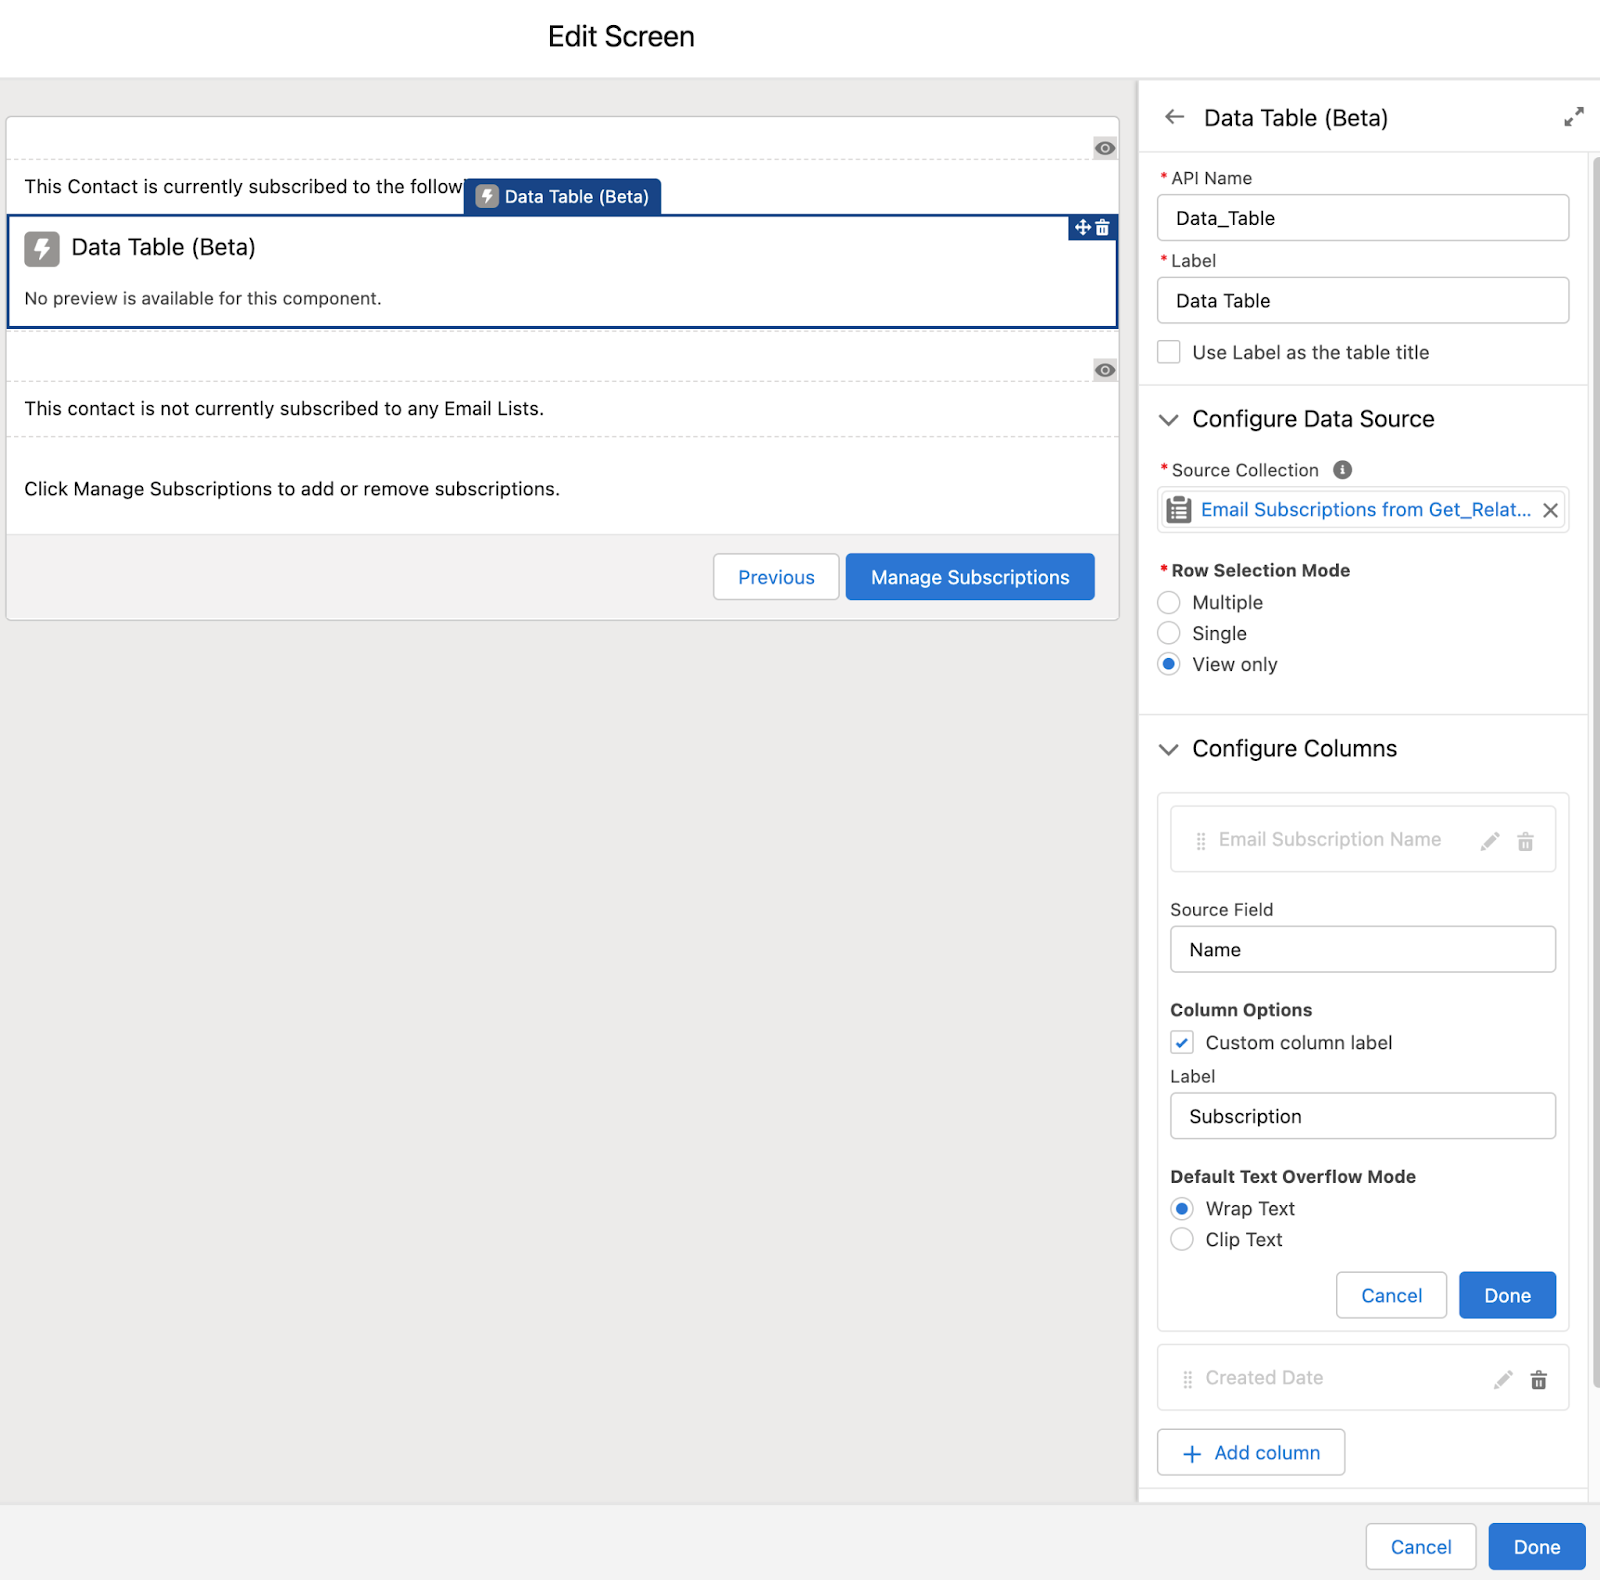
We will then add a Display Text component to each of the Section components, and a Data Table (currently in Beta) to the section that is displayed when there are existing Email Subscriptions. We also add a Display Text component below both Section components to display at all times.

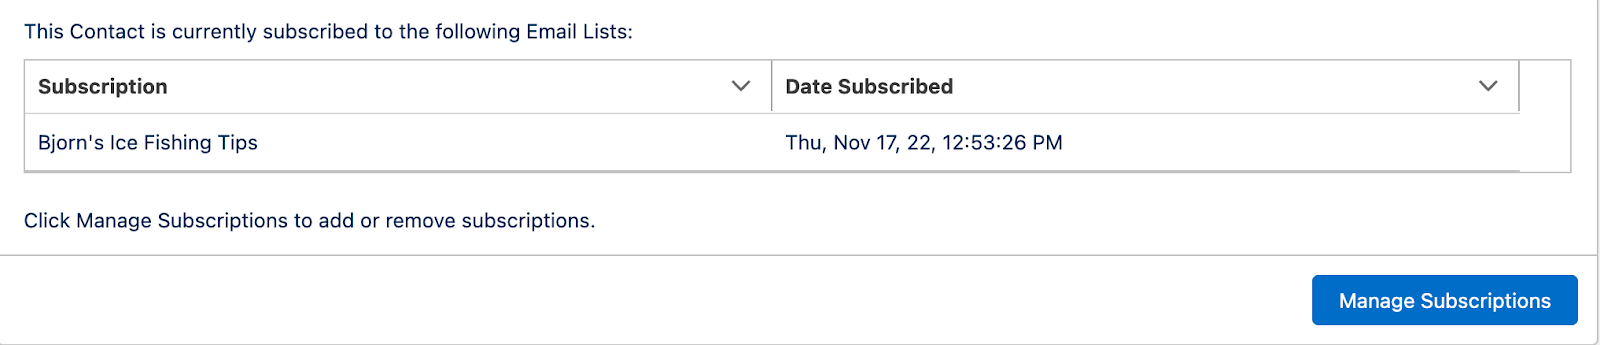
When configuring the Data Table, select the Email Subscription collection from our previous Get element and add the Email Subscription Name and Created Date fields as columns to be displayed. Next, set the Row Selection Mode to “View only” because we don’t need the user to select anything yet. I’ve also renamed the columns to “Subscription” and “Date Subscribed” respectively.
Debugging the flow for a contact with no current Email Subscription records would look like this:

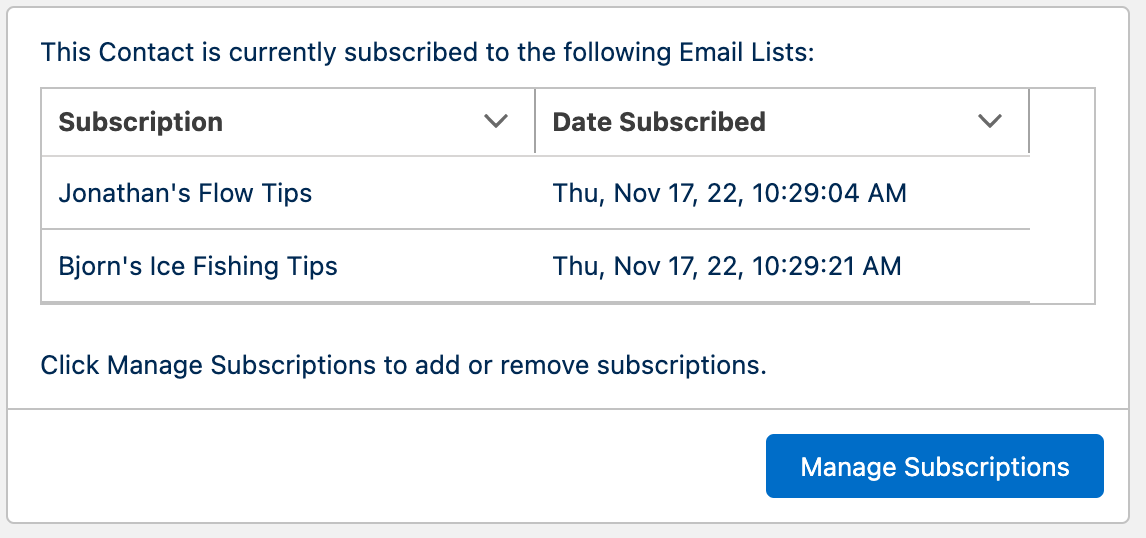
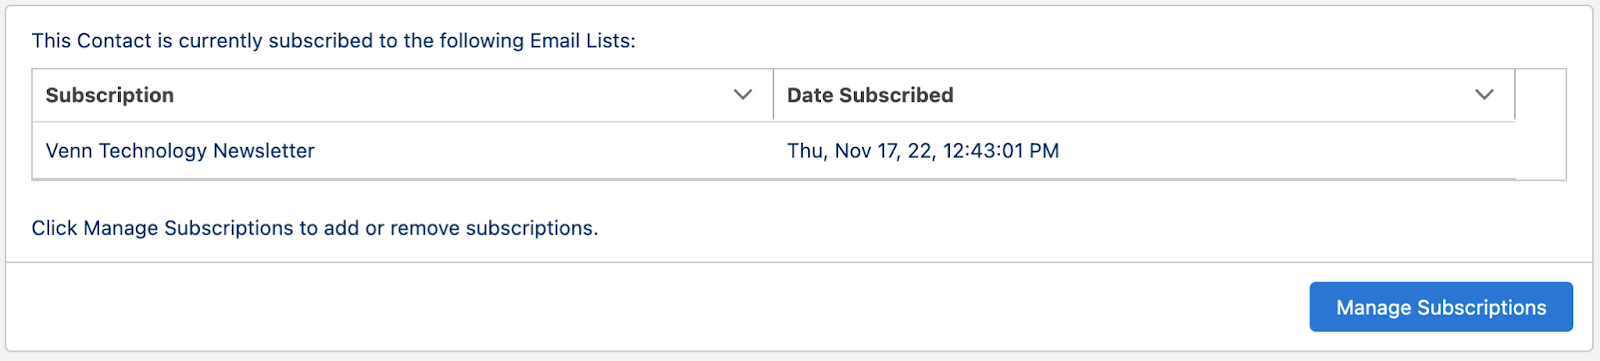
Debugging the flow for a contact with multiple Email Subscription records looks like this:
So far, we have created a way to display all of a contact’s current Email Subscriptions. Next, we want to create a way to display all of the Email Lists available for the Contact to subscribe to, and allow the user to select the Email Lists the contact would like to Subscribe to or Unsubscribe from.
Before we create our next Screen element, we have a few more things to do.
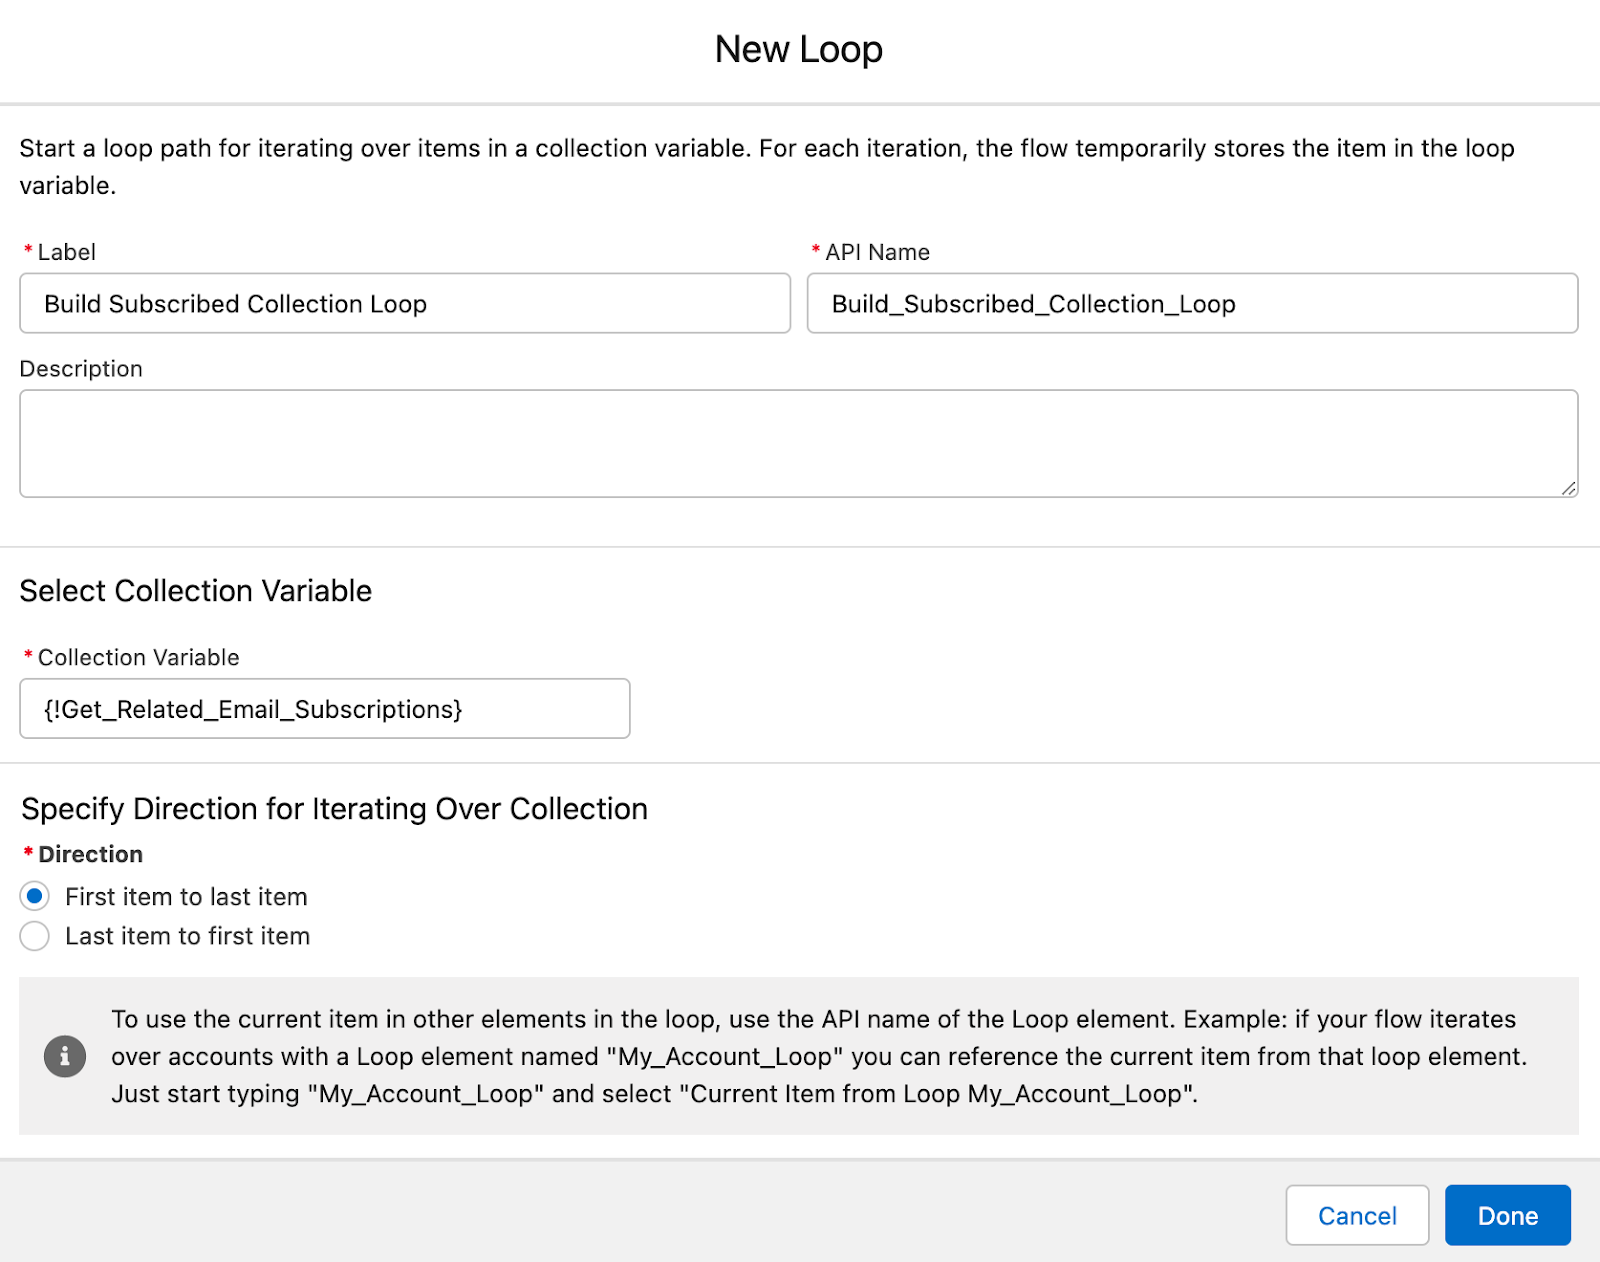
First, we need to determine what Email Lists are available for the user to subscribe to. We will use a Get element to retrieve the Email List records and can add various criteria to narrow down the selection. Keep in mind: we do not want to retrieve any Email List records that the Contact is currently subscribed to, which will require us to create a collection containing the Ids of those Email Lists to exclude. To do this, we create a Loop element after our Screen element using the collection of Email Subscriptions retrieved in our second Get element:
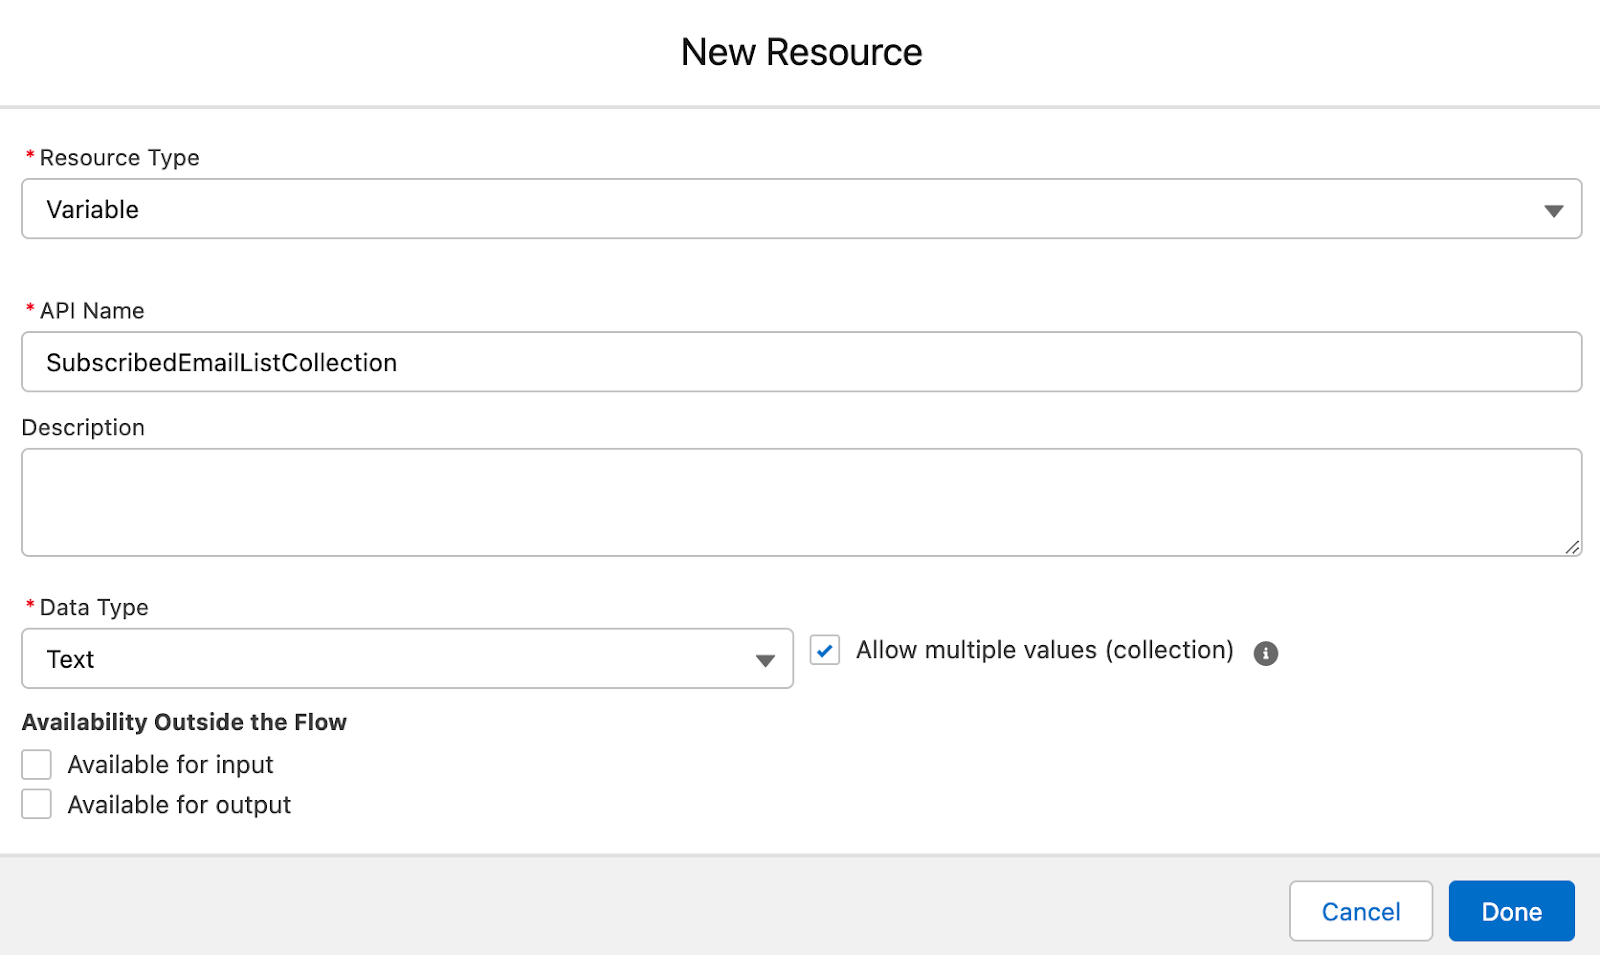
Next, we create a Text data type flow variable with the “Allow multiple values (collection)” box checked. This is where we will store the list of Ids for the currently subscribed email lists.
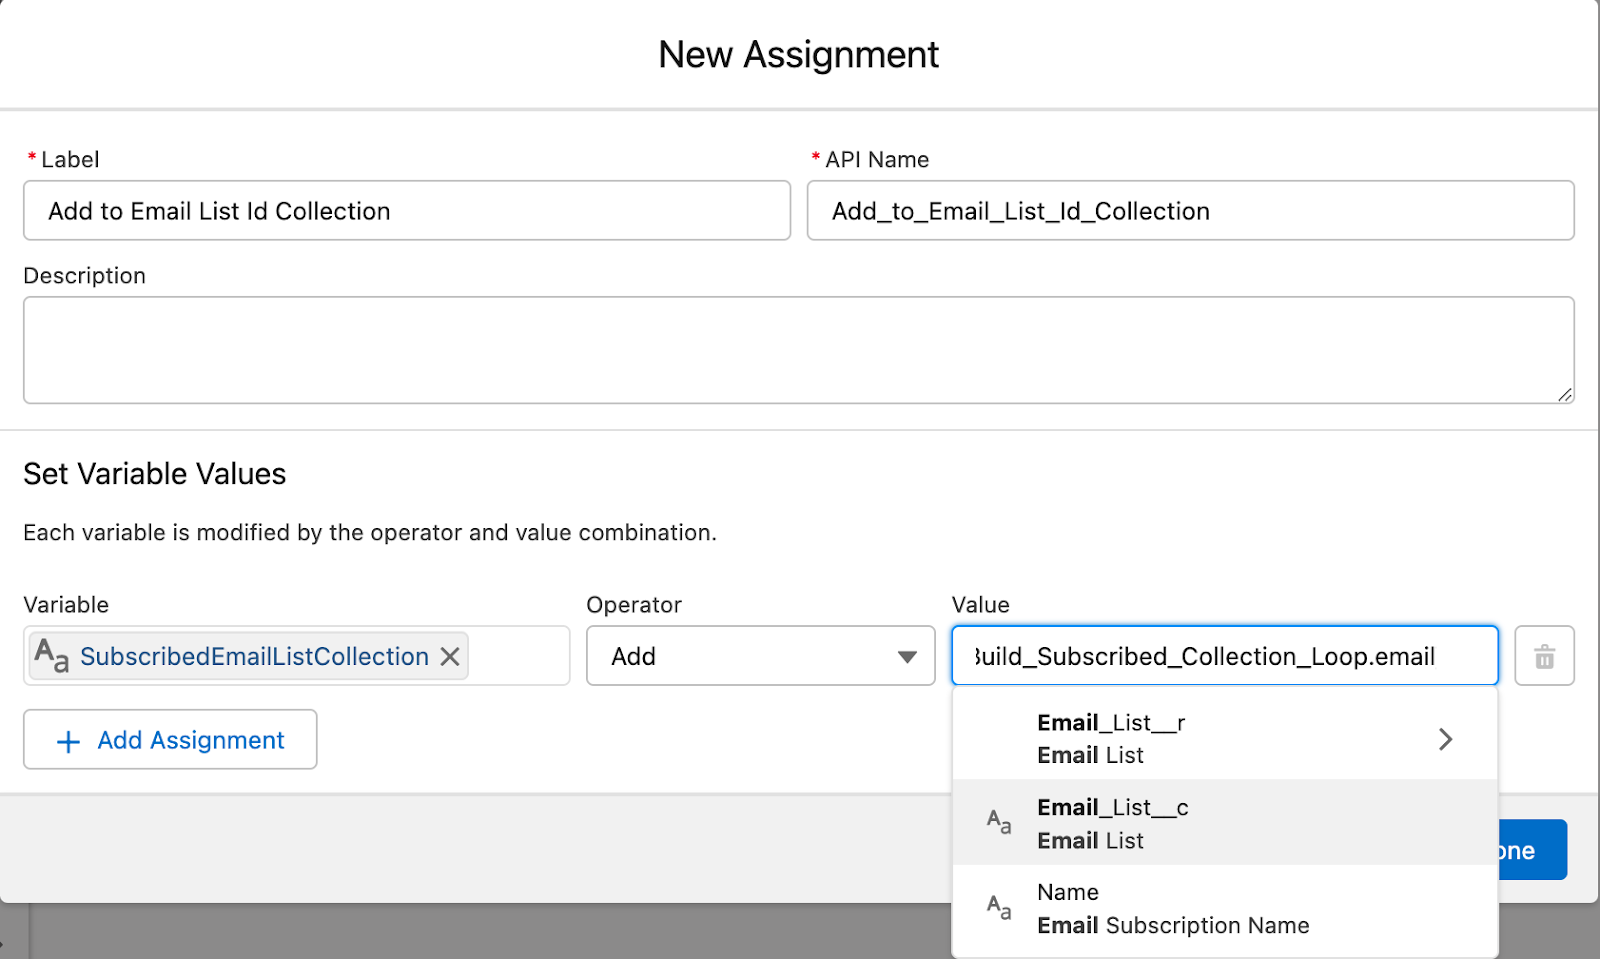
Then we create an Assignment element inside the loop to add the Email List Id of each Email Subscription in the collection to our collection variable:
Now our flow looks like this:

One thing to note here: the flow will run the Loop element even if the contact was not subscribed to any email lists, and no records returned in our second Get element.
This is not a problem in our case. The flow will go straight to the “After Last” part of the loop when it determines the collection has nothing in it and our collection for the Ids will stay empty. It is possible that if we were doing other actions dependent on there being records in that collection, we would want to split this part of the flow into a separate branch of a decision element.

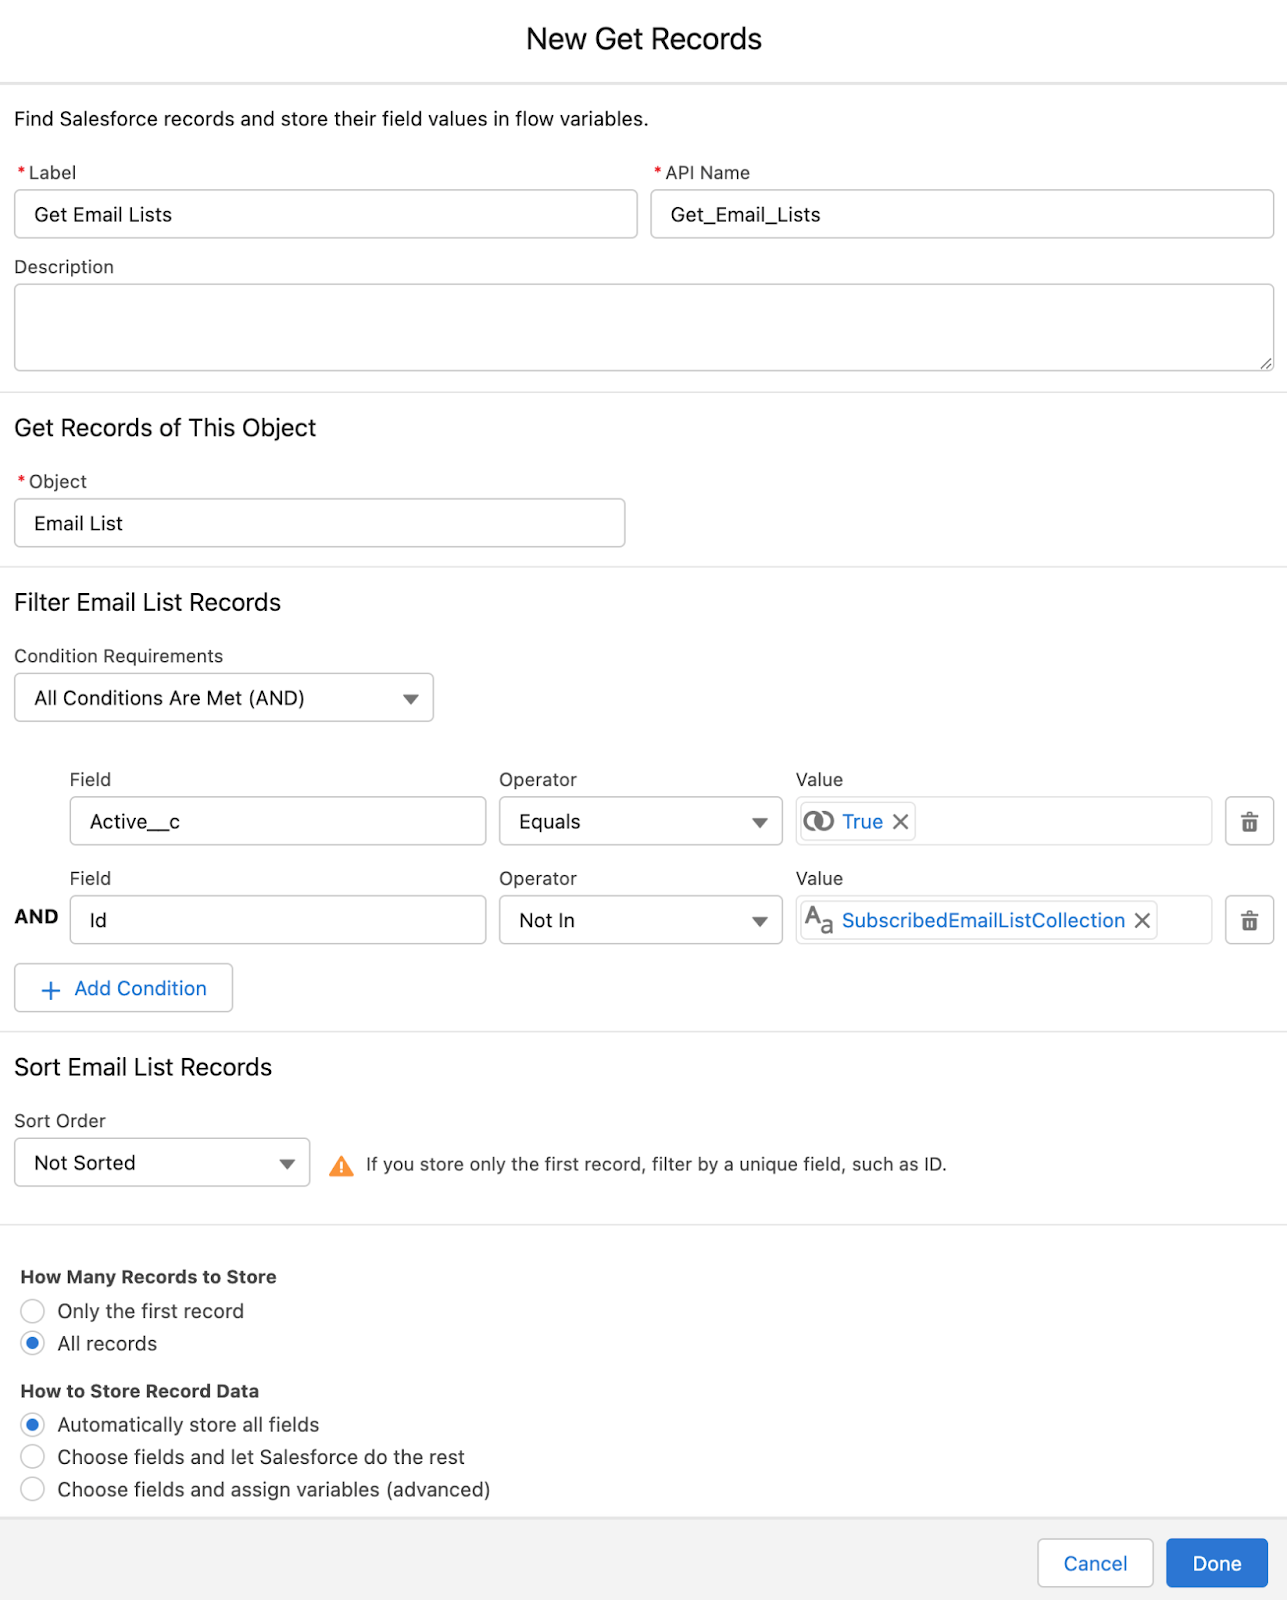
Now that we know the Email Lists we want to exclude, we are ready to retrieve our Email Lists! To do this, we create a Get element at the bottom of the flow with various criteria. In this example, I only want to select Email Lists with the “Active” checkbox field checked. We also want the Id of the records we retrieve to not be in the collection we just created, so we will use the (newly released and very exciting!) “Not In” operator to do so:
We will also create a Decision element to check if we did retrieve any email lists just like the one we previously created, so now our flow looks like this:
Now we are ready for our second Screen element!
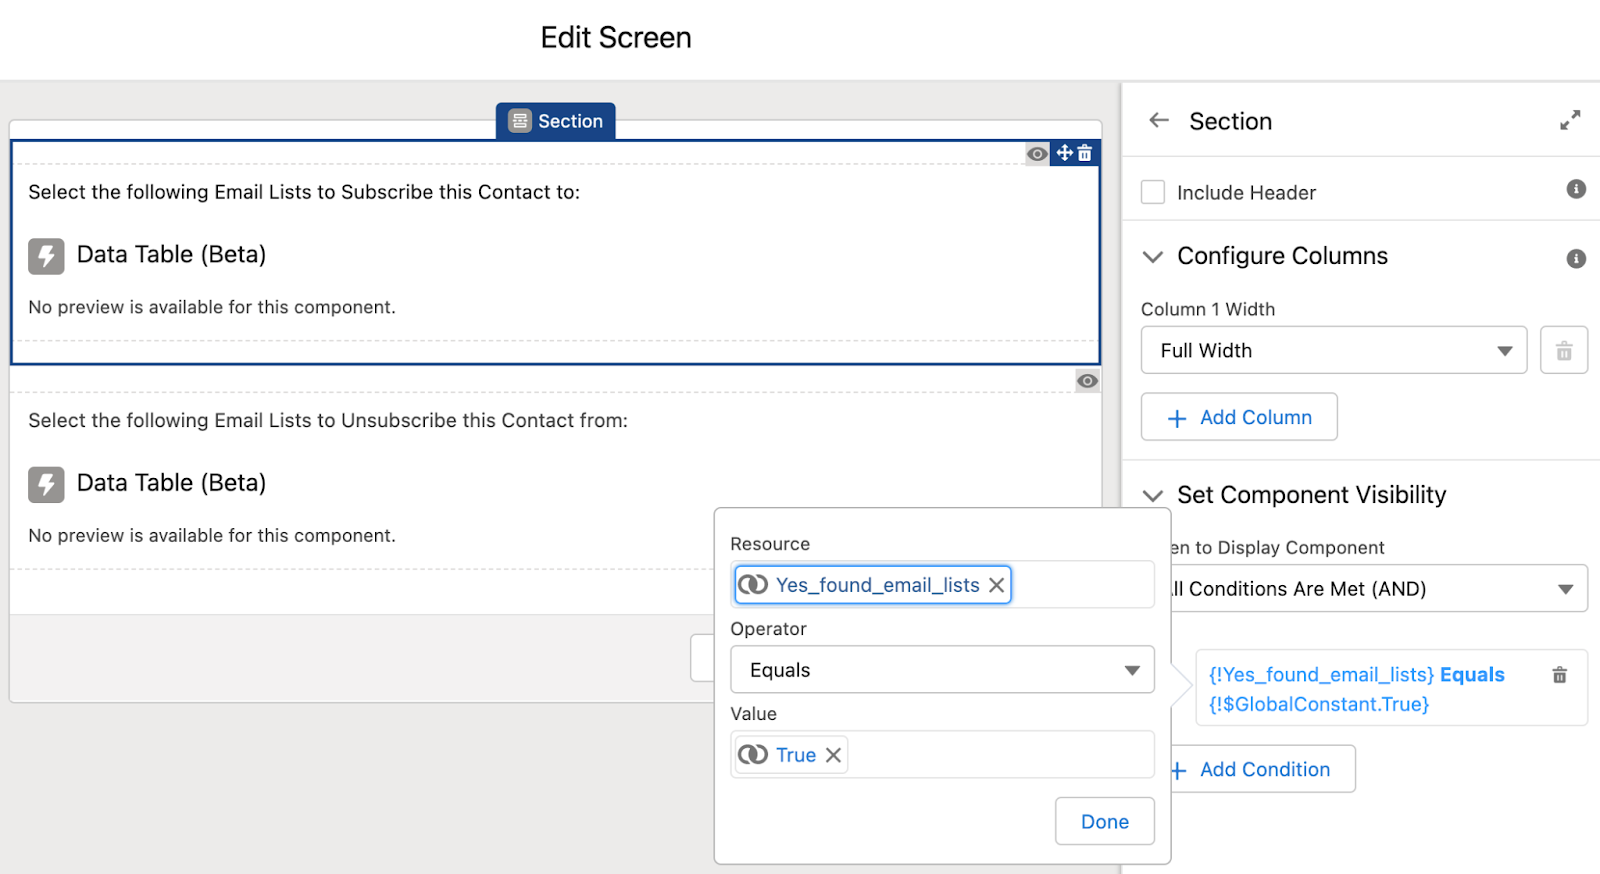
Just like our first Screen element, we start by adding two Section components. The first section will be visible based on our second Decision element for finding Email Lists and allow the user to select the Email Lists to subscribe the contact to. The second will be visible based on the first Decision element for the contact having one or more existing Email Subscriptions and allow the user to select the Email Lists to unsubscribe the contact from.
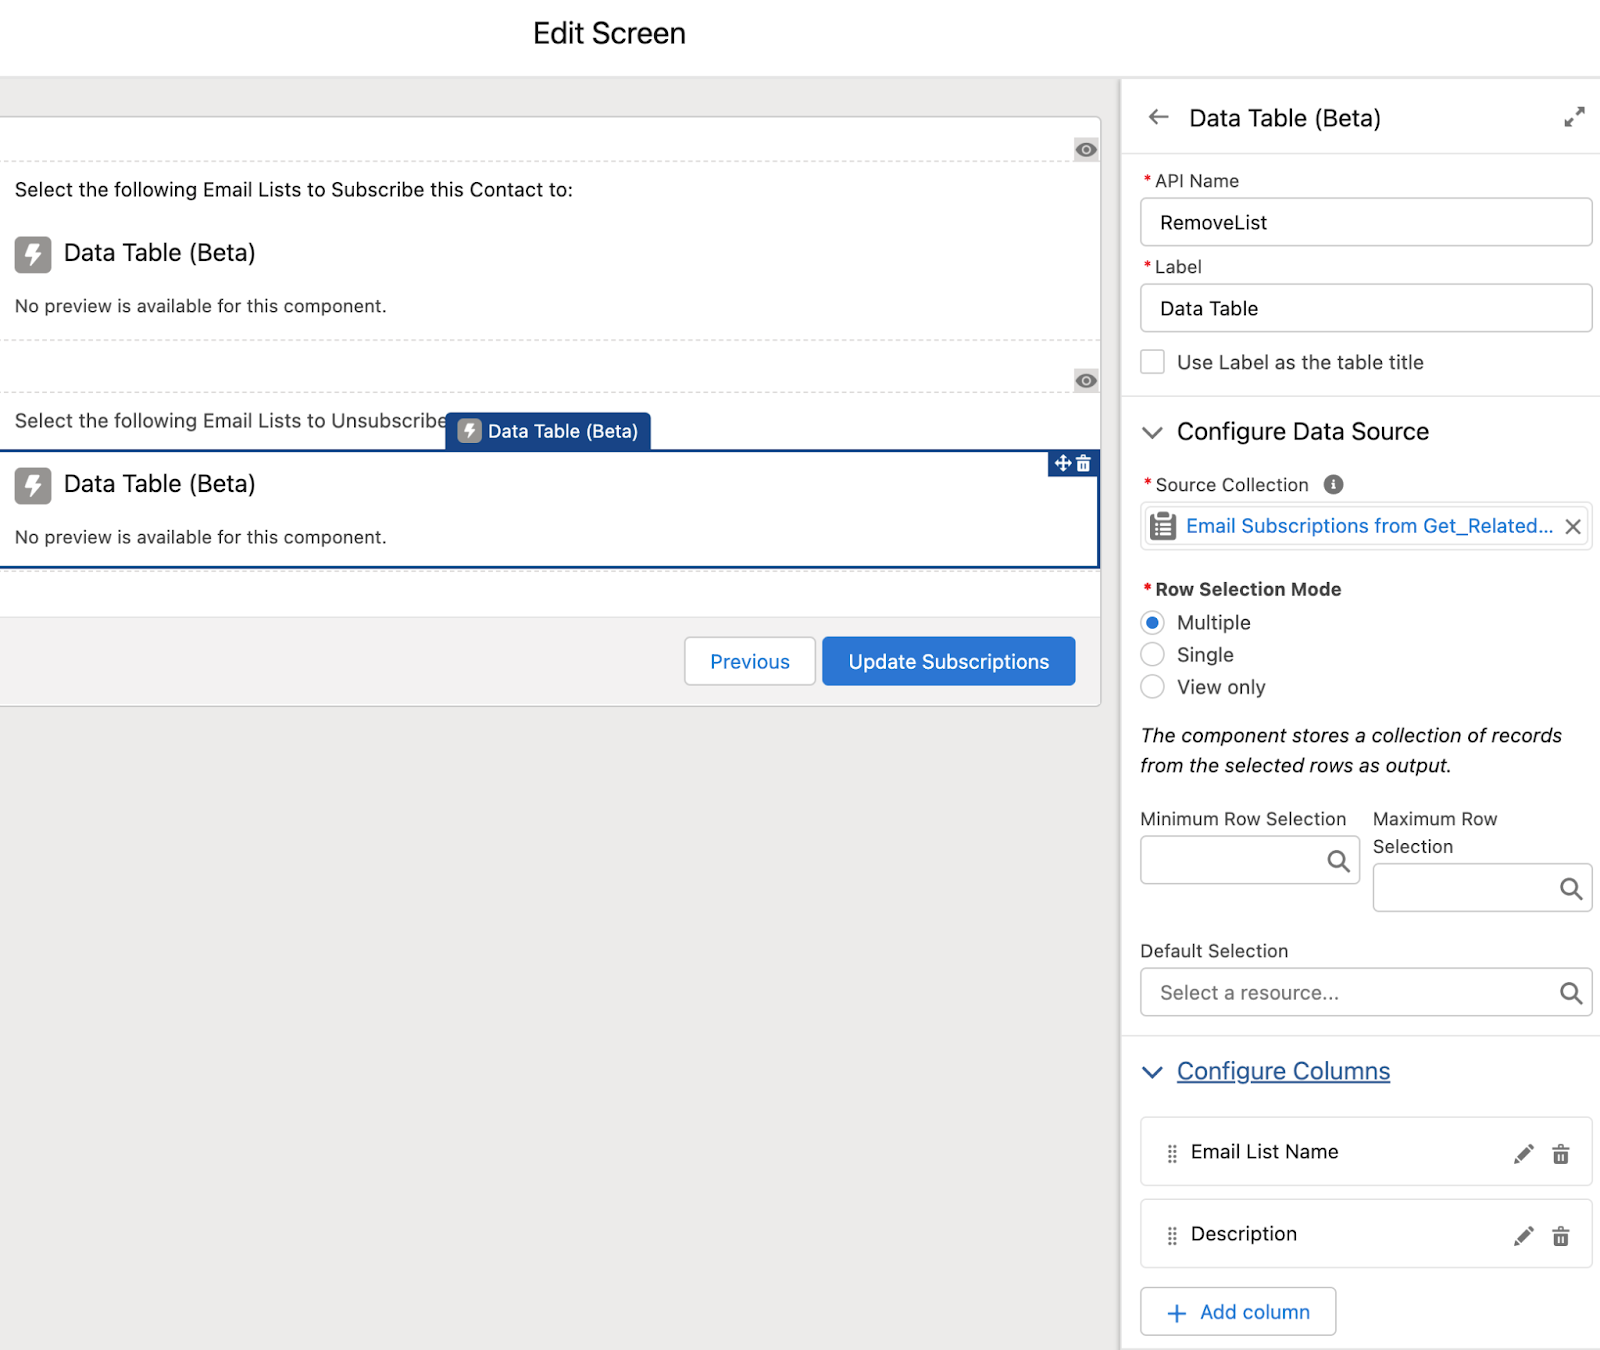
We then put a Display Text and Data Table component into each section. The first data table uses the collection of Email Lists from our third Get element, and the second uses the collection of current Email Subscriptions from our second Get element. I set the first data table’s columns as the Email List record Name and Description fields, and the second data table’s columns as formula fields on the Email Subscription record that hold the Name and Description field values from the related Email List.
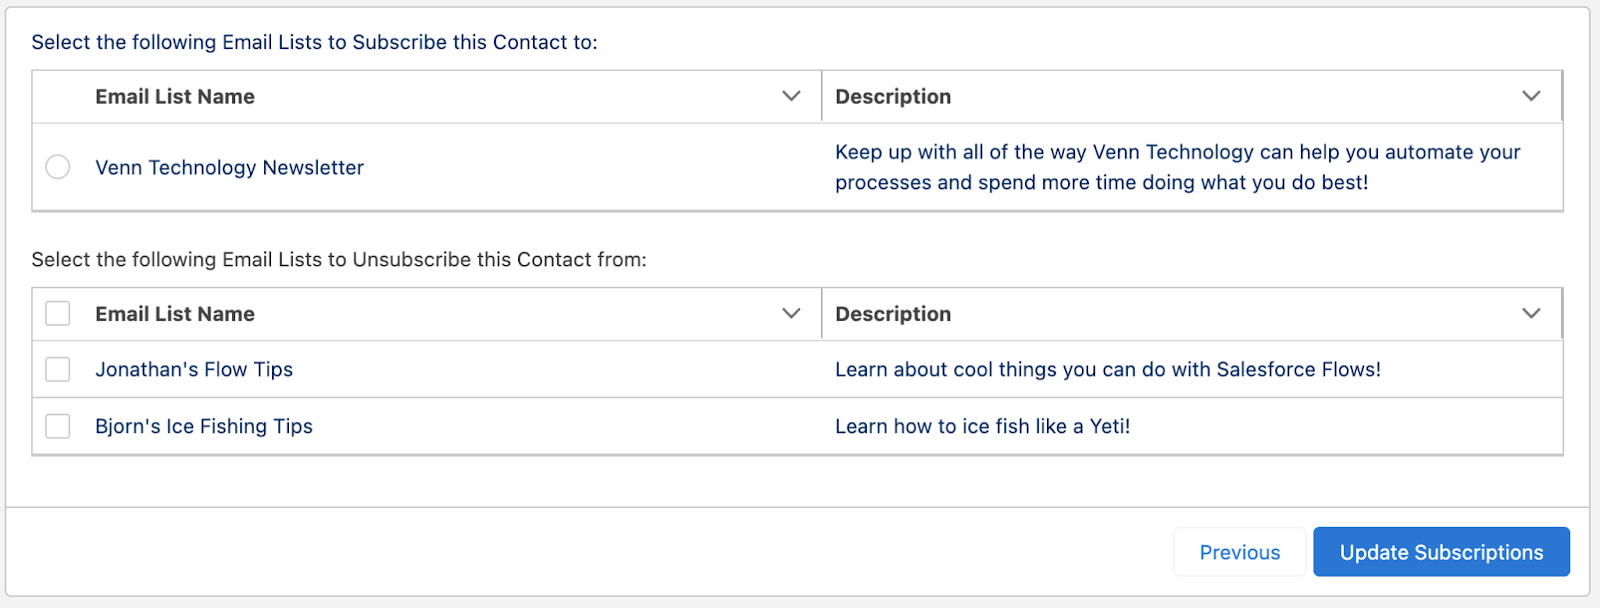
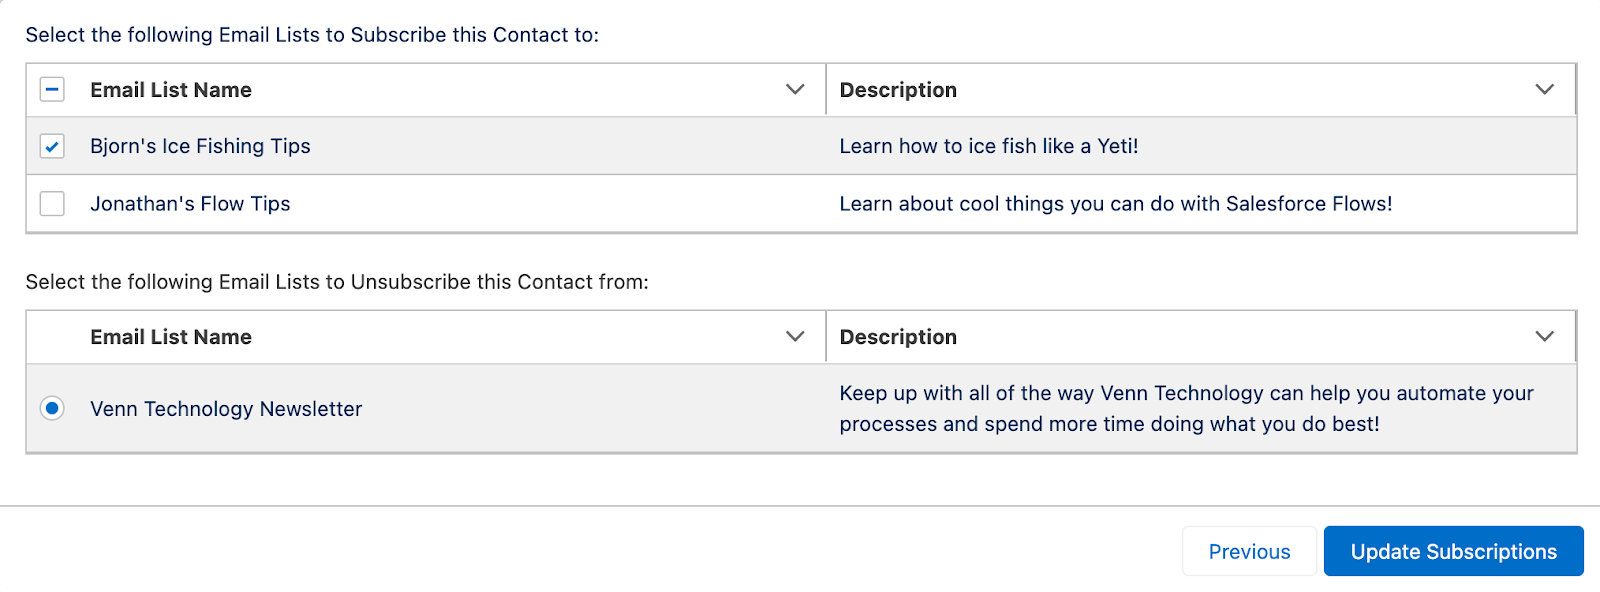
When we debug the flow using a Contact record with two current subscriptions and one other Email List in the system, our new screen looks like this:
Now that we have our two screen flows, all that remains is to create the logic and actions for updating subscription types specified by the user.
Before doing that, it’s helpful to understand how the table components work. When the “Row Selection Mode” for the data table is set to “Multiple,” the screen component becomes available for selection later on in the flow and has a “selectedRows” collection variable within it that contains only the records that were selected from the table.
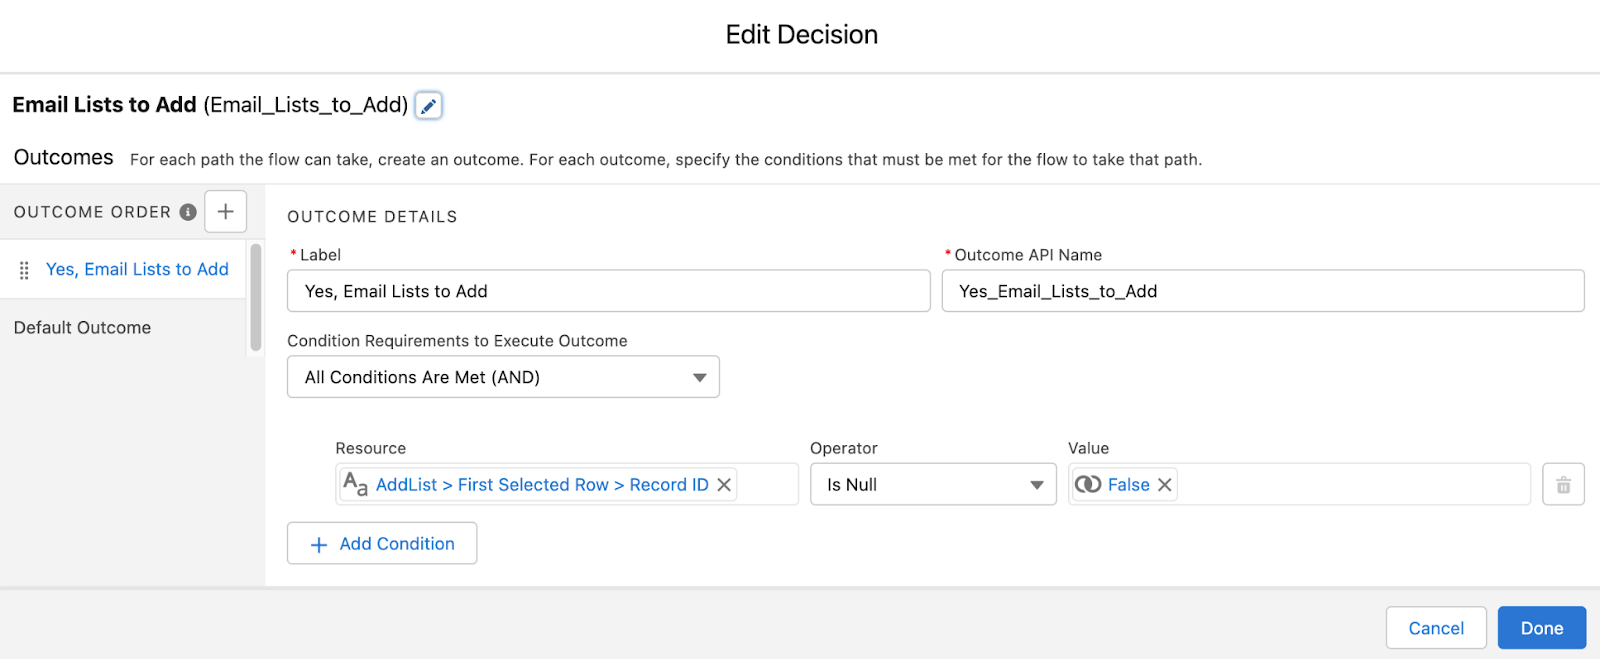
The strange thing about this collection is that if no records were selected, it still isn’t considered empty by Decision elements but is detected as still containing brackets. However, the data table also has a “firstSelectedRow” record variable inside that contains the values of the first selected row, which can be used to check if any records were selected by checking its Id field.
So, the first thing we do next is create a Decision element to check if any email list rows were selected to be added as subscriptions. We do this by checking if the firstSelectedRow.Id field from the data table is null. If it’s not, then at least one Email list was selected.
We then create a Loop element on the ‘Yes’ side of the Decision element loop through the records in that “selectedRows” collection.
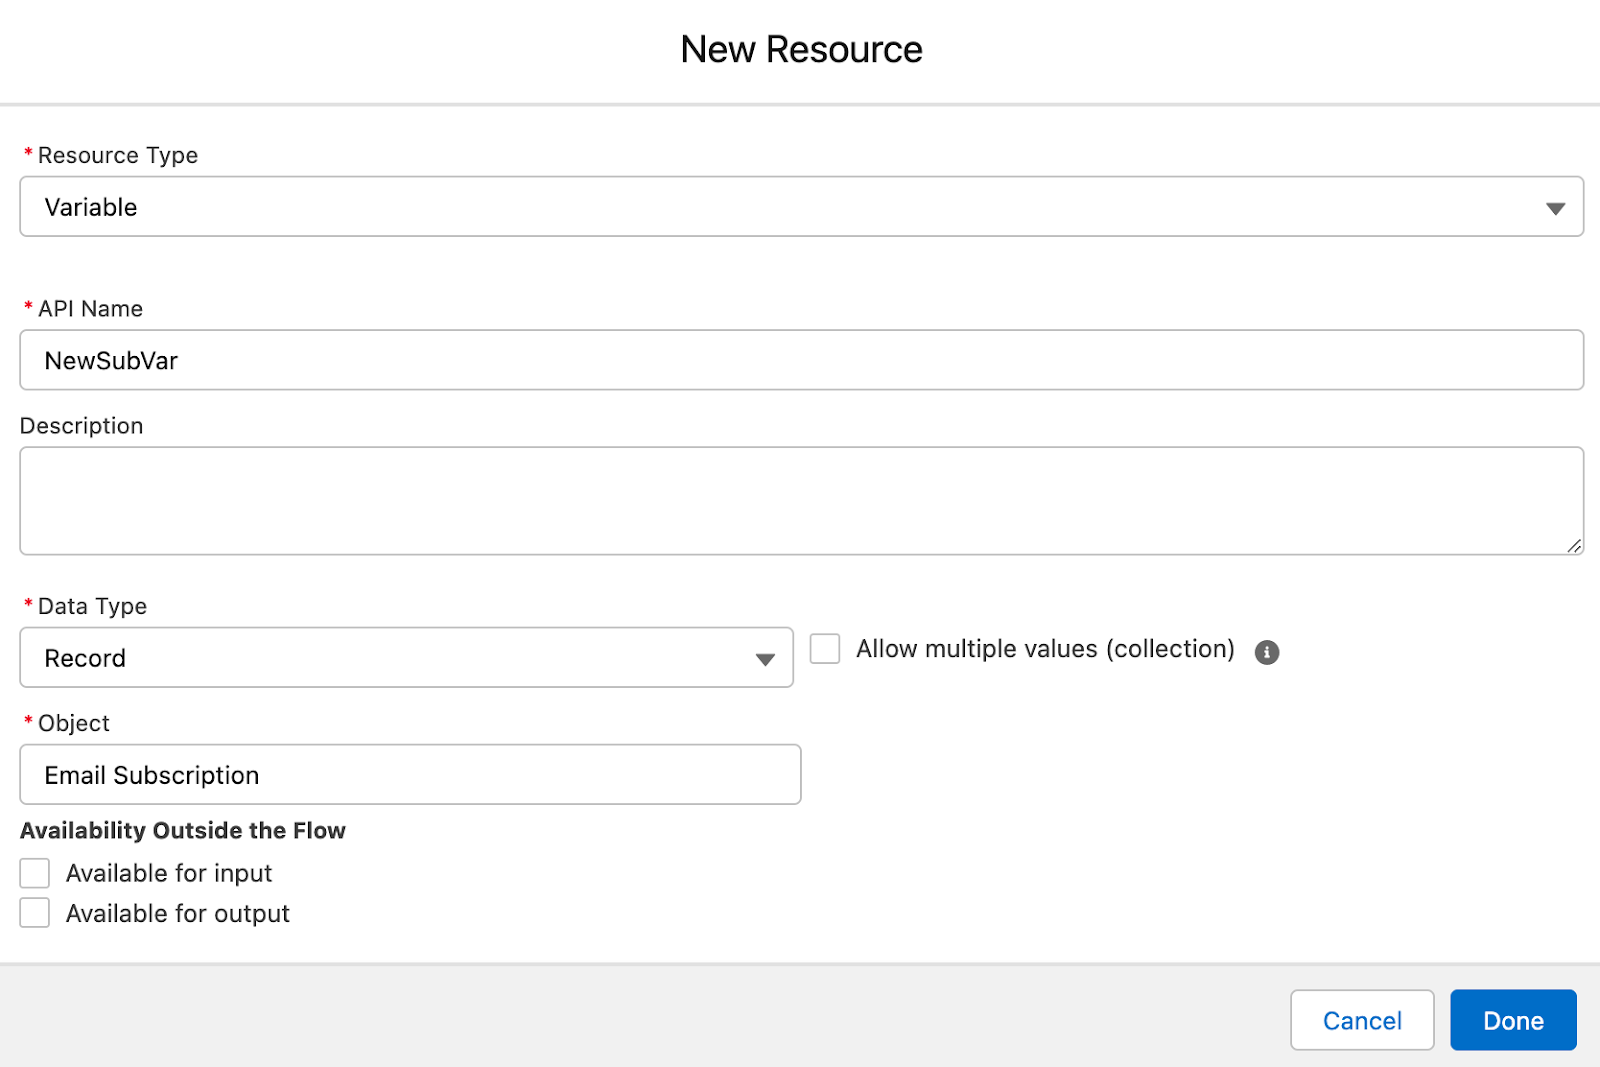
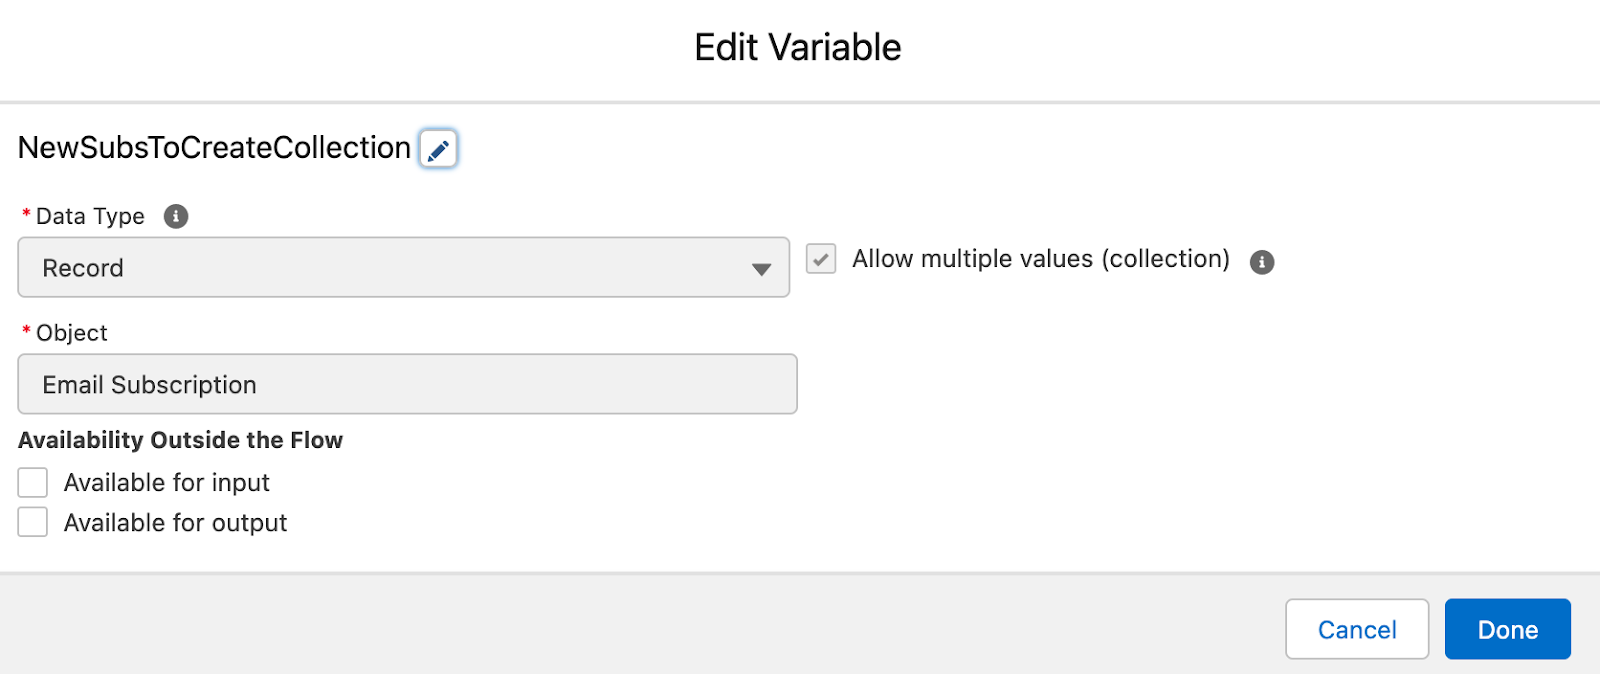
Then, we create a Record Data Type flow variable to hold the values of each Email Subscription we need to create, and a collection variable of the same type to hold them all.
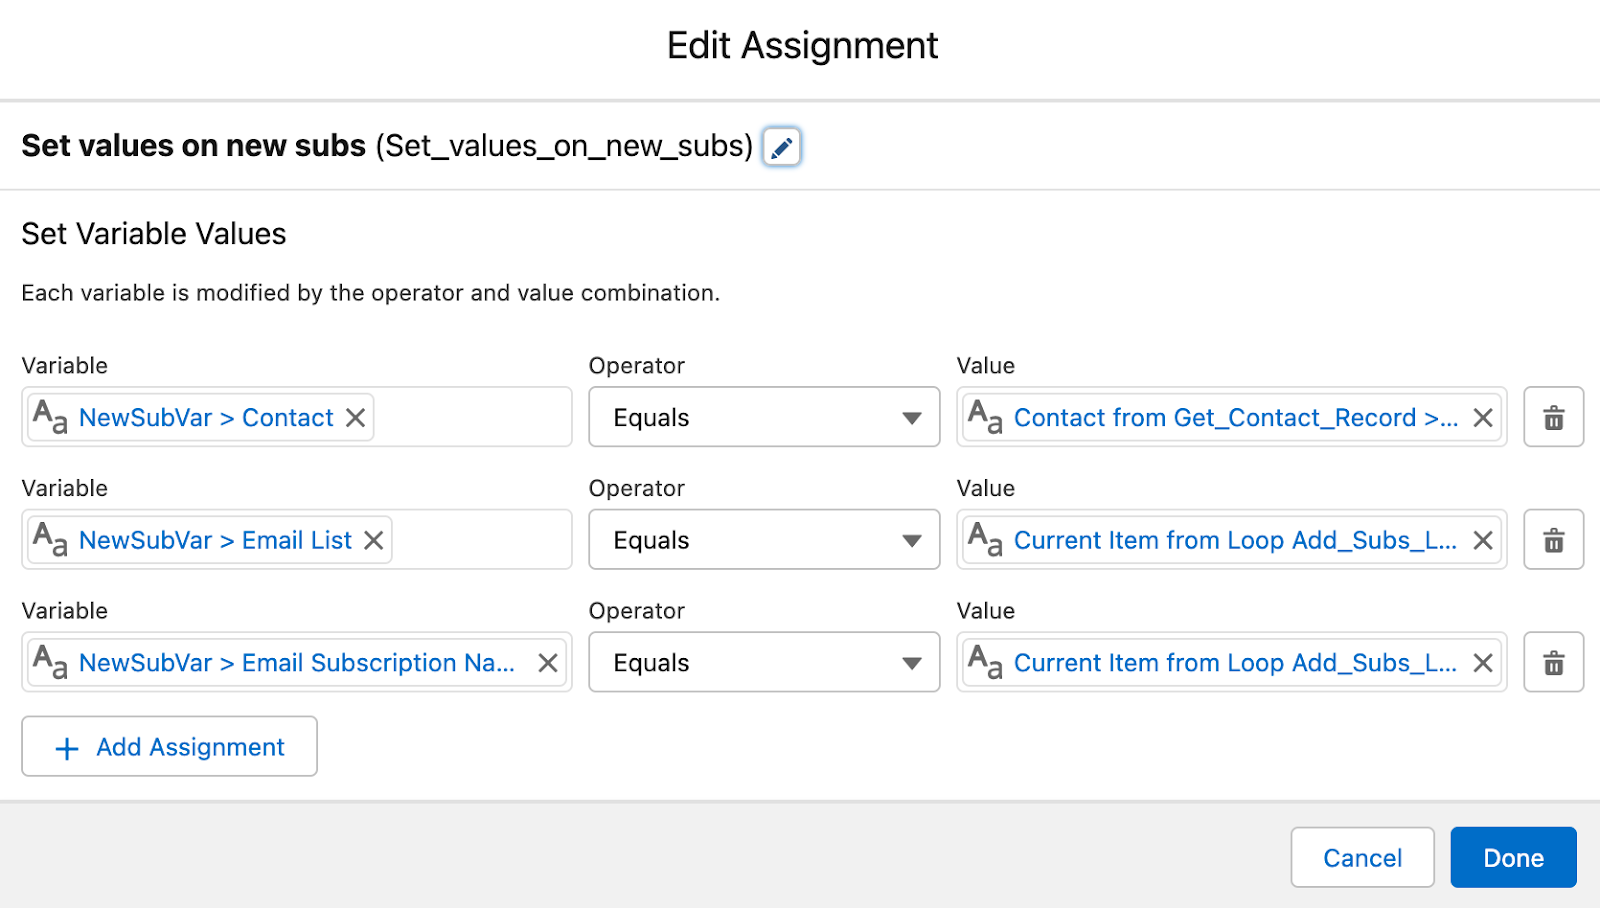
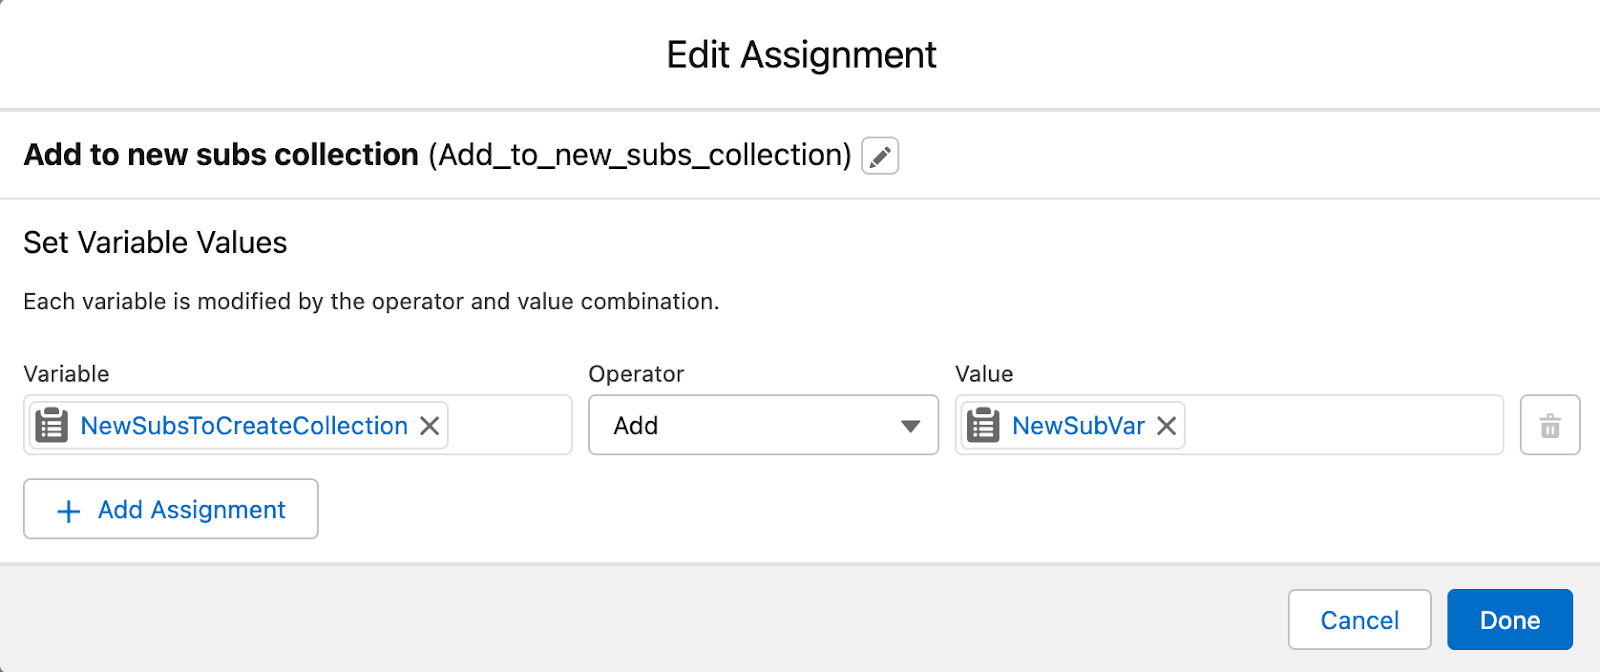
Next, we create two Assignment variables inside the loop:
- One, to set the values for the records we need to create (we set the contact Id from the contact record we got in the first Get element, the Email List Id from the current item in the loop, and the Name field as the name of the current Email List in the loop)
- The other, to add the variable to the collection we plan to create the records from.
We then use a Get element to create the new Email Subscriptions in the collection.
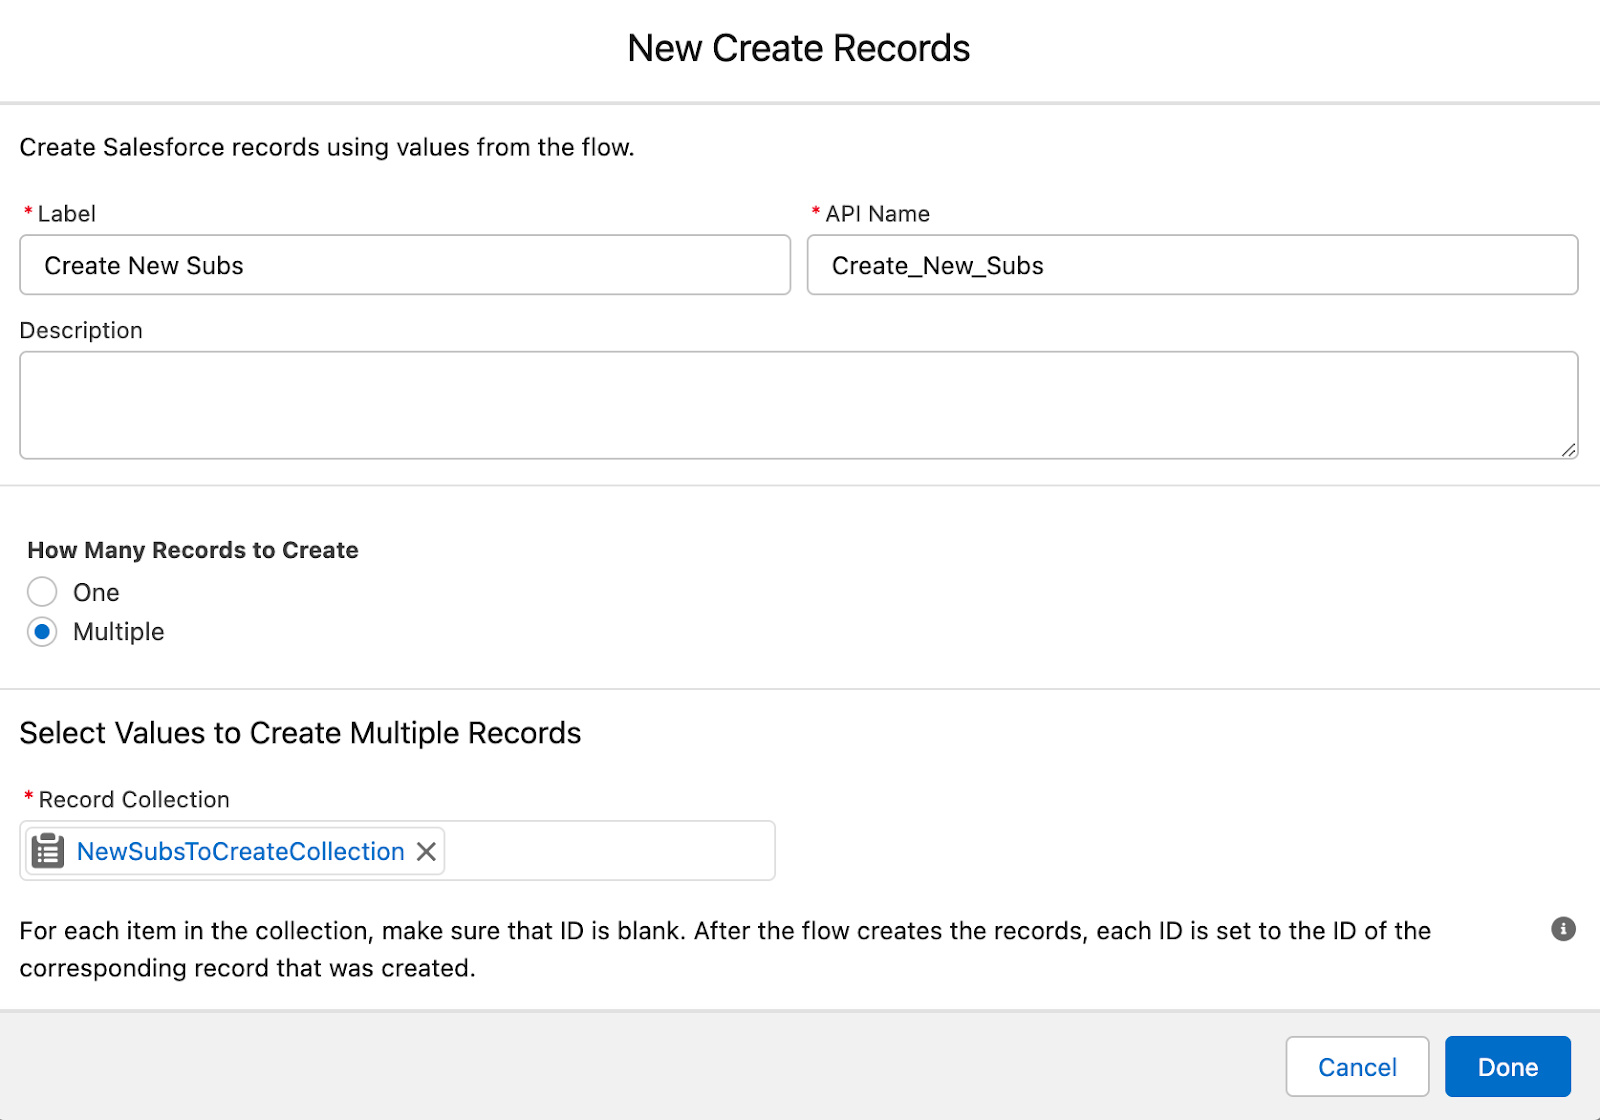
This part of the flow now looks like this:
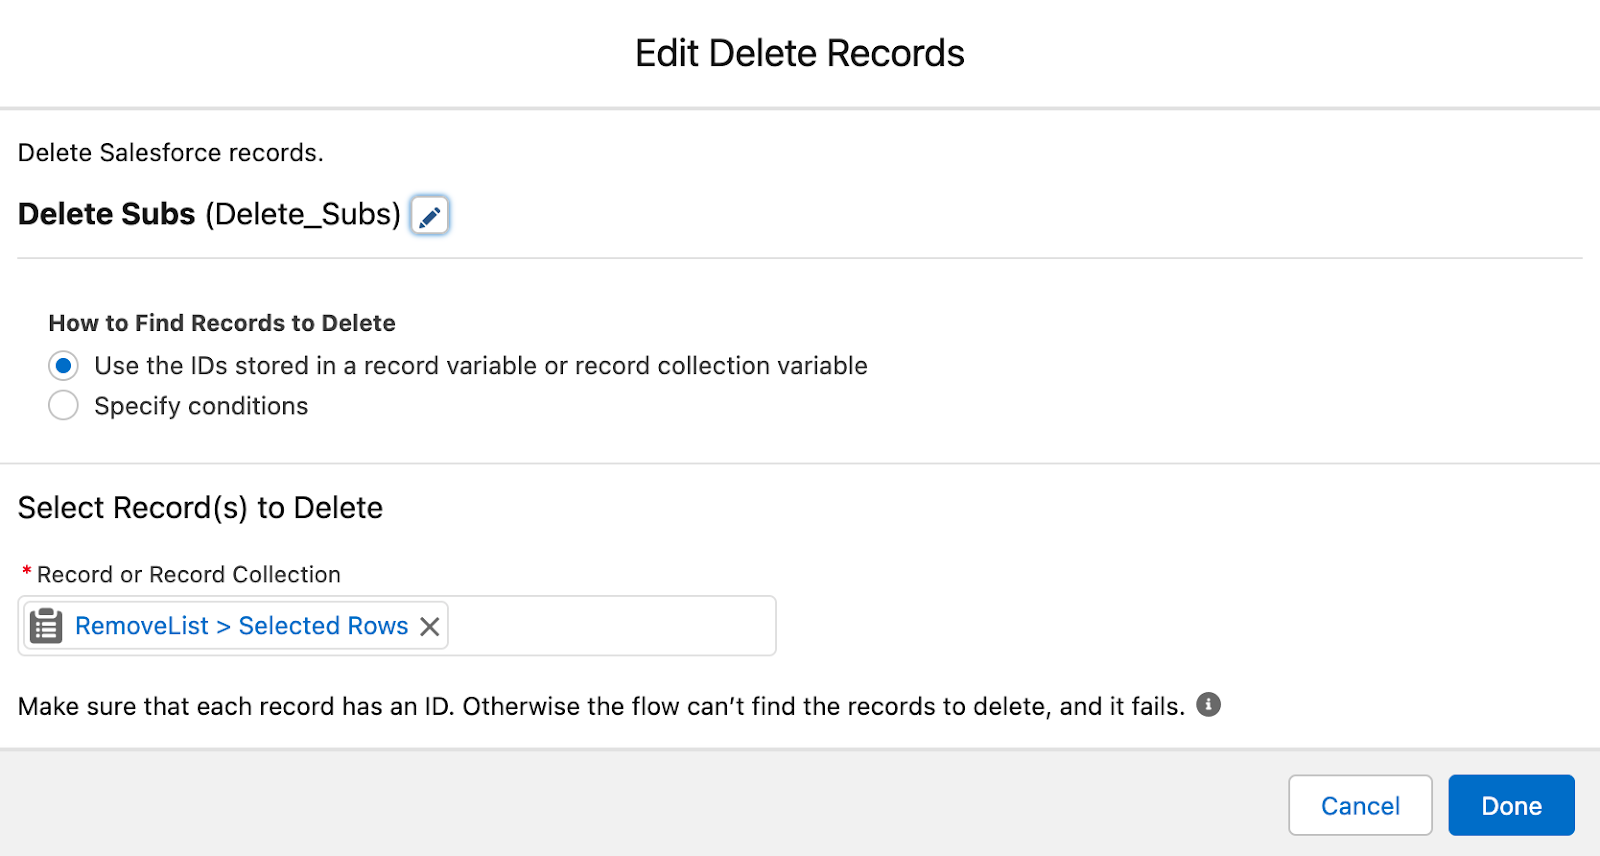
Only one part left to go: the removal of subscriptions the Contact no longer wants. We start with a Decision element to check if any items were selected from the second data table of the second screen.
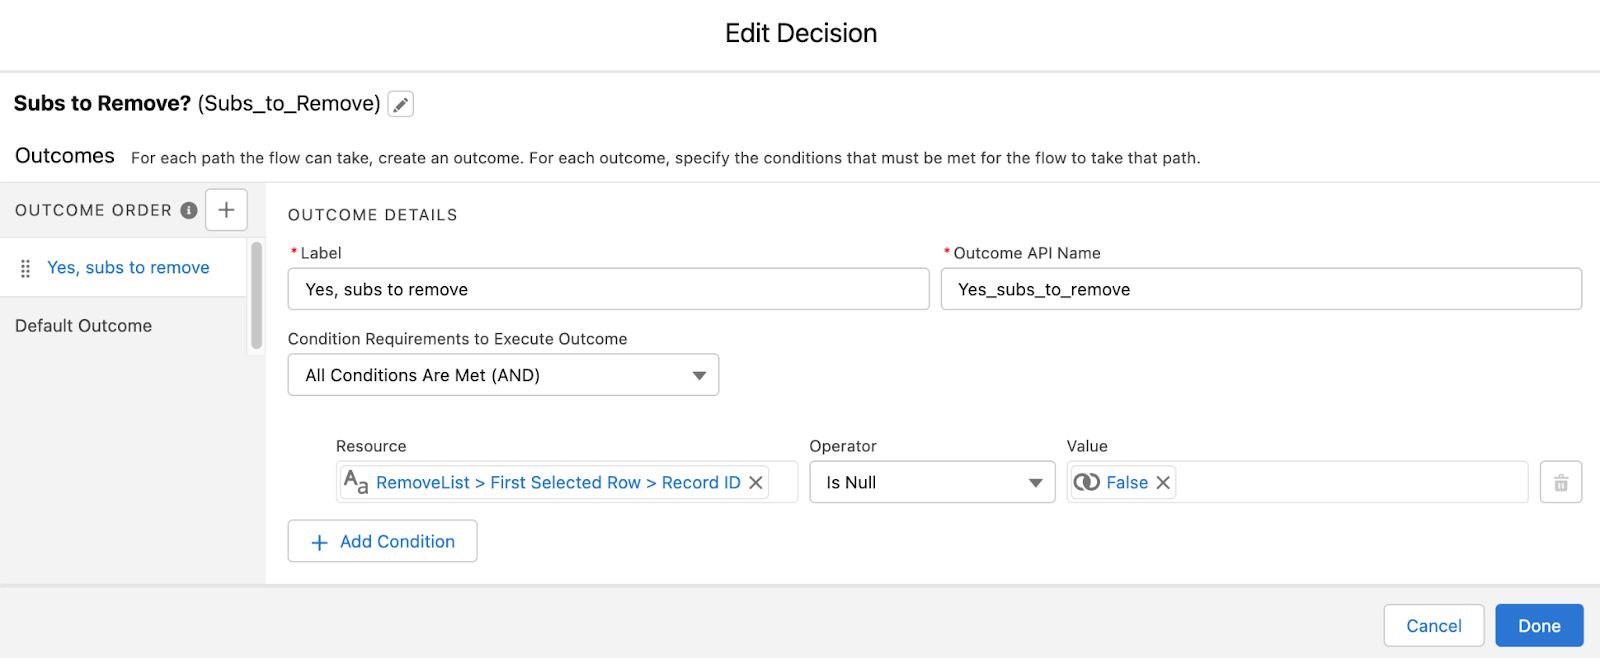
Then, we add a Delete element to the ‘Yes’ side of the flow path to delete the records contained in the selectedRows collection of the data table.
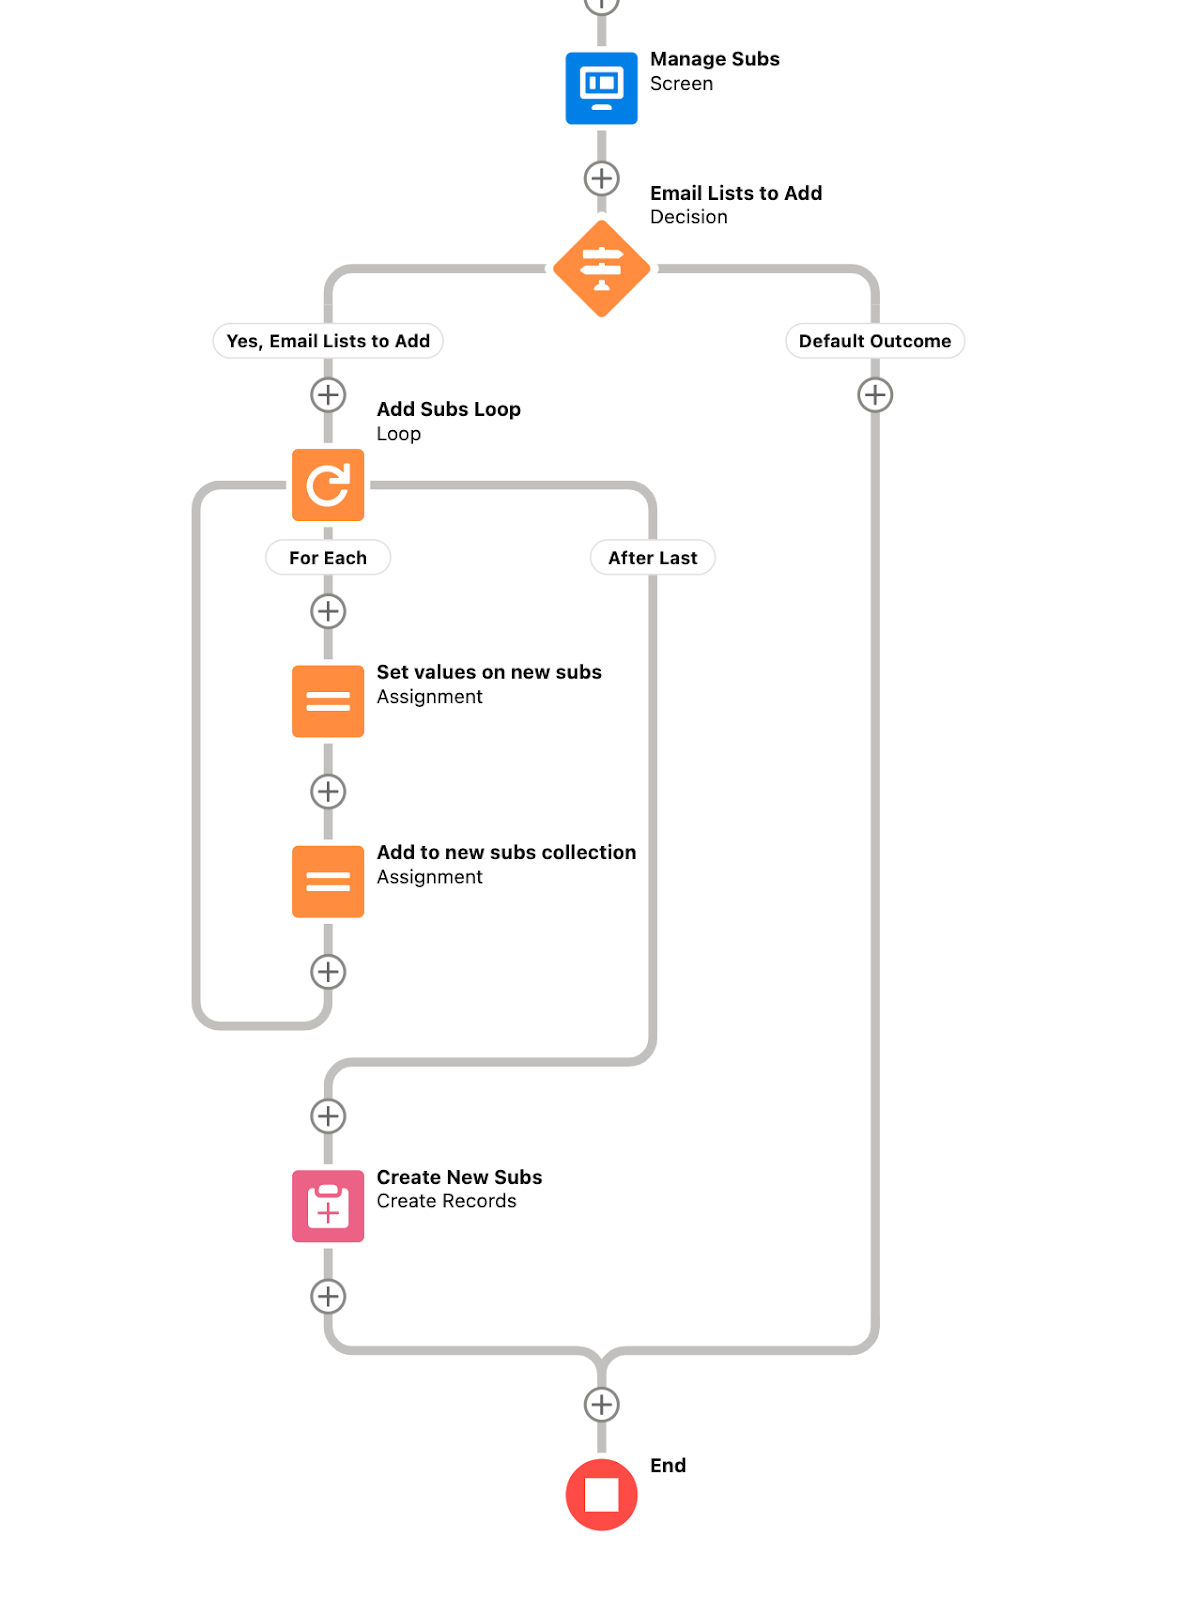
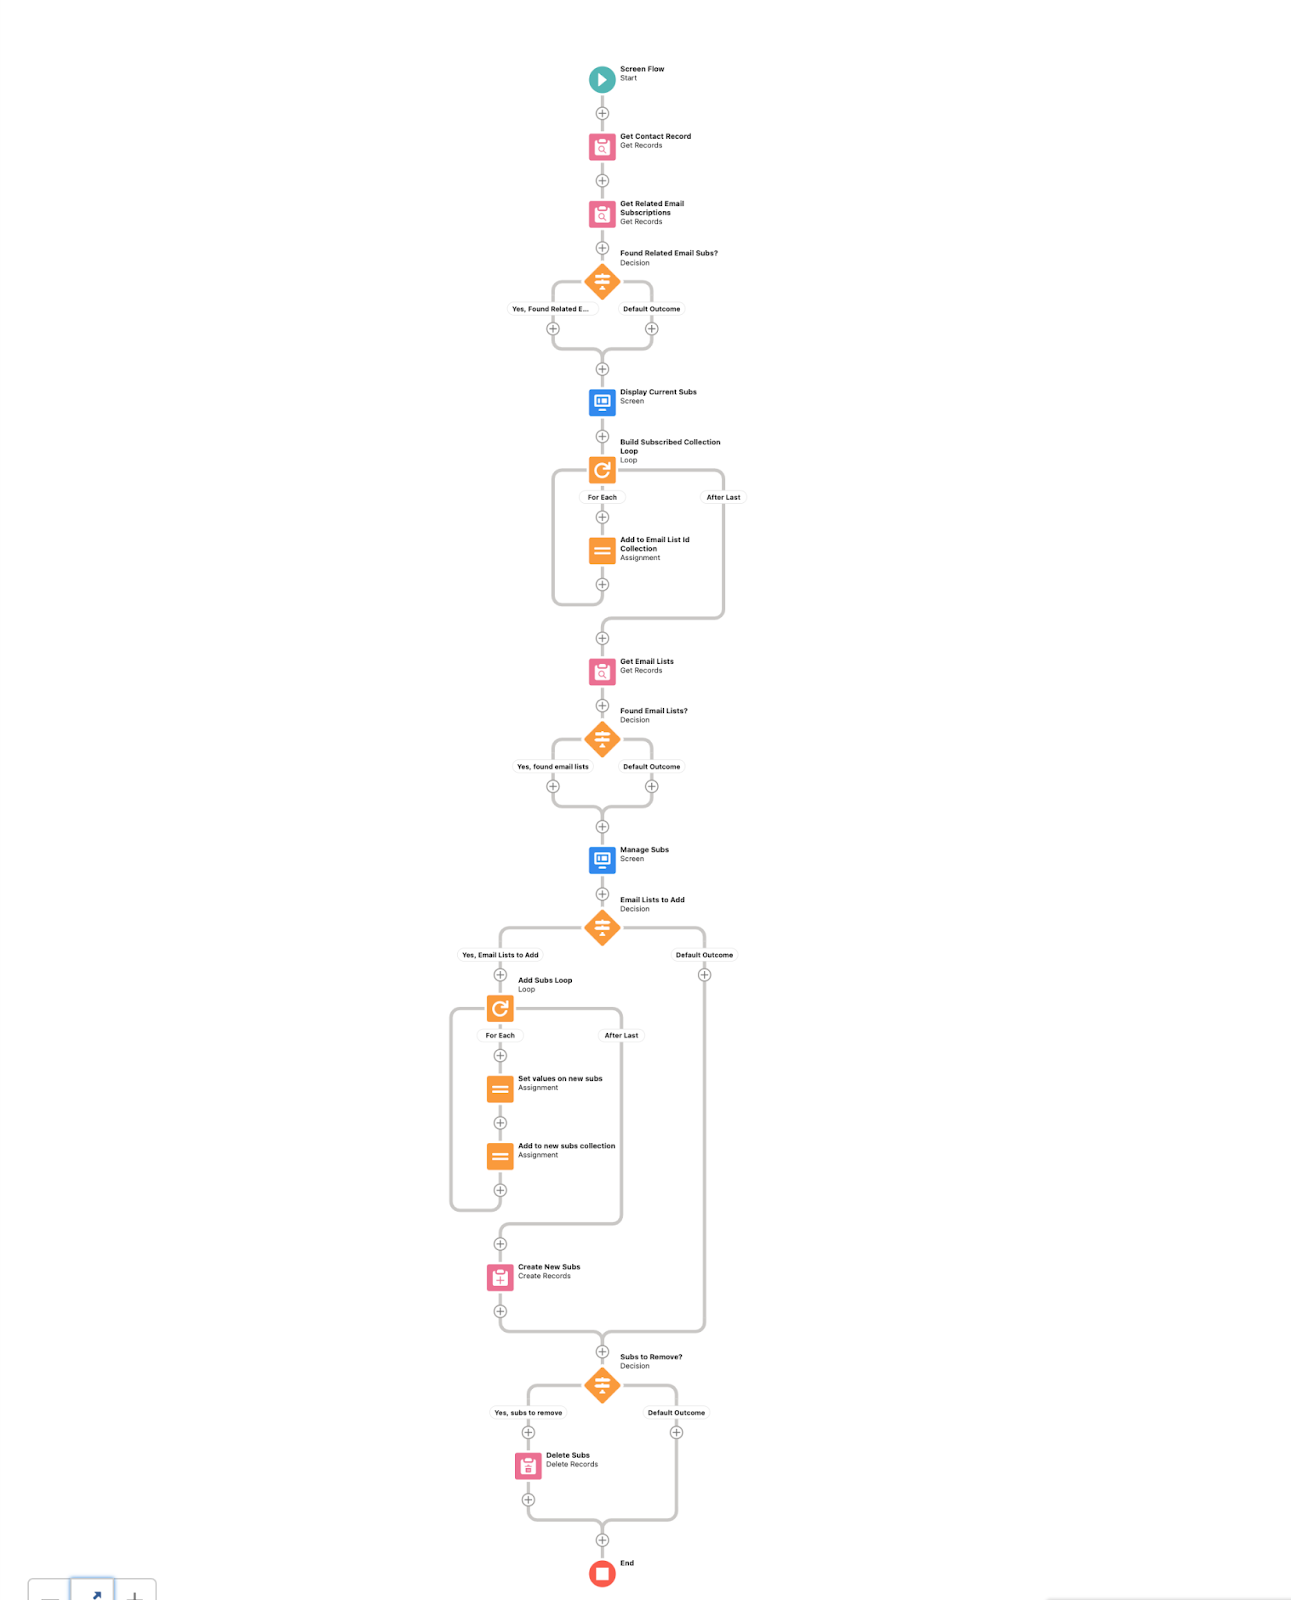
And that is it! The flow now looks like this:
When we debug the flow with a Contact that is currently subscribed to one Email List, the first screen looks like this:
On the next screen, we make some selections:
When we push the “Update Selections” button, the flow makes the changes and ends. In cases when used on an actual record page or Salesforce Experience Site page, the flow would automatically start over and show us the first screen again with our changes made:
Conclusion
This Flow was a lot of fun to build, and we hope you learned something! This is just one example of the great things that can be done with Salesforce Flows. Follow us on social or subscribe to our monthly newsletter to stay up-to-date on all things Salesforce and automation.
Other blogs to explore:
• Salesforce Flow Basics: Data, Elements, Decision and Assignment
• Using Slack Workflows to Manage Customer Support Requests
• Salesforce Flow Basics: Loop, Collection Sort, and Collection Filters
• Salesforce Flow Basics: Screen, Pause, Action, and Subflow
• Salesforce Flow Basics: Variables, Collections, and Formulas